| Table of Contents |
|---|
General Setup
By default a 3.X and 16.X firmware is set to DHCP. In order to identify the IP, "bfdetect" has to be used.. If there is no DHCP-Server available, the beroNet devices falls back to its default IP address: 10.0.0.2
beroNet VoIP Card Setup
The beroNet VoIP Card is build in a special way, so that it appears as a network card in the server where it is installed (e.g in the beroNet Appliance). The following picture shows how the card works in the server with the mainboard.
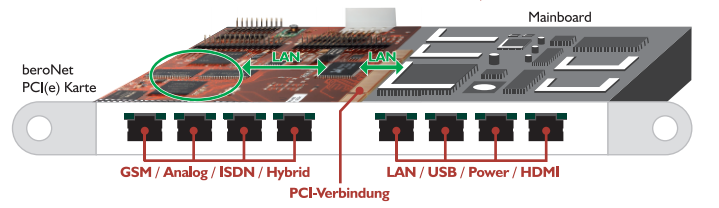
As you can see the card creates a LAN inside of the server. There are 3 major options to handle the network topology:
1. Network Bridge (recommended)
2. IP Forwarding with different LANs
3. different LANs without IP forwarding
The IP forwarding and the non-forwarding scenarios are only useful in special situations, where the beroNet VoIP Gateway part of the card should not receive an IP of the main LAN and thus be invisible to it. In most cases the network bridge setup is recommended.
beroNet VoIP Cards Bridge Setup
In the following chapters we will describe how you can configure a Network Bridge on Linux and Windows based systems.
Linux Network Bridge
You can setup the Network Bridge on Linux with the "brctl" utility. This utility is provided by the "bridge-utils" package on Debian based systems (like Ubuntu). As mentioned above the beroNet PCI/PCIe cards use MAC addresses beginning with D8:DF:0D or 00:50:C2, so you can again use the "ifconfig -a" command to identify beroNet PCI/PCIe cards:
beropbx:#ifconfig -a

   eth0   Link encap:Ethernet  HWaddr 00:0C:6E:D3:86:C6  this is standard NIC
             UP BROADCAST RUNNING MULTICAST  MTU:1500  Metric:1
             RX packets:797562 errors:0 dropped:0 overruns:0 frame:0
             TX packets:35206 errors:20 dropped:0 overruns:0 carrier:20
             collisions:7447 txqueuelen:1000
             RX bytes:141351732 (134.8 MiB)  TX bytes:19431622 (18.5 MiB)
             Interrupt:11 Base address:0xc000

   eth1   Link encap:Ethernet  HWaddr 00:50:C2:83:D0:01 this is our berofix PCI card as you can see on the MAC-Address
             UP BROADCAST RUNNING MULTICAST  MTU:1500  Metric:1
             RX packets:35124 errors:0 dropped:0 overruns:0 frame:0
             TX packets:276362 errors:0 dropped:0 overruns:0 carrier:0
             collisions:0 txqueuelen:1000
             RX bytes:20636164 (19.6 MiB)  TX bytes:28931756 (27.5 MiB)
             Interrupt:11 Base address:0xa000

  lo       Link encap:Local Loopback
             inet addr:127.0.0.1  Mask:255.0.0.0
             UP LOOPBACK RUNNING  MTU:16436  Metric:1
             RX packets:9 errors:0 dropped:0 overruns:0 frame:0
             TX packets:9 errors:0 dropped:0 overruns:0 carrier:0
             collisions:0 txqueuelen:0
             RX bytes:720 (720.0 b)  TX bytes:720 (720.0 b)
In this example eth1 is the beroNet PCI card and eth0 is our default network interface which is connected to our LAN. We want to assign the IP address 192.168.0.2 to our LAN interface and the IP Address 192.168.0.3 to our beroNet device. After we have setup the Network Bridge we want to access the beroNet PCIe card from all machines in our LAN, which are located in our network 192.168.0.1-254. To establish the Network Bridge, you have to use a few commands like described in the following example:
berofix:# ifconfig eth0 0.0.0.0 up
berofix:# ifconfig eth1 0.0.0.0 up
berofix:# brctl addbr br0
berofix:# brctl addif br0 eth0
berofix:# brctl addif br0 eth1
berofix:# ifconfig br0 192.168.0.3 up
These commands will first remove the IP-Addresses from the network devices and then will create the Network Bridge and add your standard network card (eth0) as well as the beroNet PCIe card (eth1) to this newly created Network Bridge (br0). In the example above we applied the 192.168.0.3 to the Network Bridge. The default IP settings of the beroNet PCI/PCIe cards are 10.0.0.2 Netmask 255.0.0.0. To make the beroNet card reachable from our LAN the IP-Address of the beroNet device has to be changed. This can be done using the "bfdetect tool" (which is described in the next chapter) or through the webinterface of the beroNet device. So we assume the beroNet IP Address has changed to 192.168.0.3 with Netmask 255.255.255.0 . If everything was setup as it should, you should be able to reach the beroNet device(192.168.0.3) from any machine in your LAN. Unfortunately this described way is not persistent and will be deleted after rebooting the machine.
To setup this Network Bridge in a persistent way, you can modify your "/etc/network/interfaces" file on Debian based systems (like ubuntu):
auto lo
iface lo inet loopback
auto br0
iface br0 inet static
address 192.168.0.2
netmask 255.255.255.0
gateway 192.168.0.1
bridge_ports eth0 eth1
After that you have to restart your networking:
berofix:#/etc/init.d/networking restart
After everything is up and running, you should be able to reach the beroNet device (192.168.0.3) from any machine in your LAN.
Windows Network Bridge
To use the Network Bridge under Windows based Systems (Windows SBS Versions don't seem to support Network Bridging) open the "network connections" window. As already seen in the chapter "IP-Forwarding", you will see two network controllers. Your standard Host Network Controller ("Local Area Network Connection 1") and the beroNet Network Controller ("Local Area Network Connection 2"). To create the Network Bridge please mark both connections and click the right mouse button. The following context menu will appear:
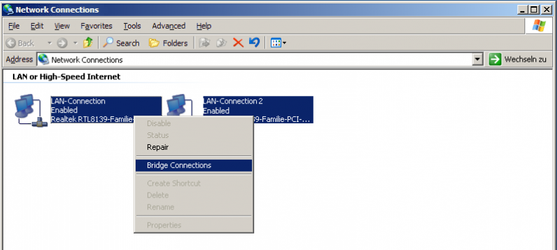
Click on "Bridge connections" and a third controller will appear, our Network Bridge:
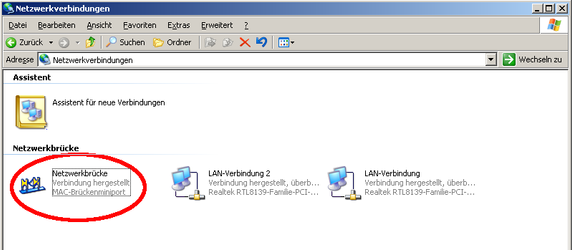
As you might have noticed, the network controllers don't have any IP Address's anymore. You can only assign an IP-Address to the Bridge Controller. By default the bridge is in DHCP mode. To edit the bridge, click the right mouse button, choose "Preferences" and configure an IP-Address. At that moment the Network Bridge is reachable throughout the LAN - you can also reach the beroNet web-interface. For example:
Let's assume your LAN is 172.20.0.0/255.255.0.0, your bridge got an IP 172.20.5.194 and you configured beroNet internal IP-Address to 172.20.70.11. Through the configured bridge, beroNet is reachable from the whole network now, if your firewall is not blocking it!
bfdetect
The latest version of bfdetect can be found in the downloads page. It is used to discover the beroNet device IP-Addresses of the local subnet. It can also be used to change the network settings of the beroNet device, e.g. to set it into DHCP or static IP mode.
NOTE: bfdetect can be disabled via preferences->network in the GUI, to avoid unwanted network setting changes from bfdetect users in the local subnet.
After changing the IP-address or identifying it, the web-GUI can be used to configure the gateway. Just type the IP in your favorite browser and you should see the login-screen.
| Page Tree | ||||||||
|---|---|---|---|---|---|---|---|---|
|