Using a beroNet Gateway with "freepbx / trixbox / elastix / AsteriskNow"
beroNet Gateway with freePBX / trixbox / elastix / AsteriskNow
This small howto will describe you how to use a berofix Gateway card / box together with a freePBX, trixbox, elastix or AsteriskNow system. trixbox, elastix and AsteriskNow are using the freePBX GUI, so this howto should work for all of them. There are of course some minor differences, but in general the way how to connect and configure the berofix should be very similar. In this howto we have installed a trixbox version 2.8.0.4 with Asterisk 1.6 from the iso image on a standard i686 PC together. Customers using a berofix PCI or PCIe card can continue with chapter 2 "Configuring the network". All others using berofix boxes can skip this chapter and continue with Chapter 3.
Configuring the Network
Due to the special design of the berofix card the operation system will detect the berofix as a standard network card (RTL8139 for berofix PCI and RTL8101 for berofix PCIe). The recommended way to configure a berofix in your environment is by using a network bridge setup. The advantage hereby is that the berofix device will be in the same network as the trixbox and all other VoIP devices.
Network Bridge Setup
So we have the trixbox installed with the IP-Address 172.20.18.18 on eth0. eth1 is our berofix card. The next steps we have to do are to put eth0 and eth1 in a bridge and give the bridge the IP-Address 172.20.18.18 (the same that we gave eth0 before). After that we have to change the IP-Address of our berofix card to 172.20.22.105.
To configure a bridge over your berofix card and your network card, you'll need to login as root on the console of your trixbox-server.
- Install the 'bridge-utils' package:
To enable network-bridging on your computer, the 'bridge-utils' package needs to be
installed. Just enter the following command to install them:

yum install bridge-utils
- Retrieve a list of your installed network cards:
Type the following command to get a list of your installed network cards

ifconfig -a

You'll get a list of all network cards. The beroNet Cards have a MAC Adress Range of
# D8:Df:0D:XX:XX:XX or
# 00:50:C2:XX:XX:XX

for example:
eth1	Link encap:Ethernet	HWaddr 00:50:C2:AA:BB:CC
In this example eth0 is the installed network card while eth1 is the
installed beroNet Gateway card (identifiable through the Hardware / MAC address). This can change depending on the PCI configuration of the mainboard. Sometimes the beroNet card is eth0 instead.
- Setup the permanent bridge:
To setup the bridge, you need to edit the files that specify the configuration
of your network cards. Therefore you need to change to the directory
'/etc/sysconfig/network-scripts'.

cd /etc/sysconfig/network-scripts

Edit the files ifcfg-eth0, ifcfg-eth1, etc. with your favorite editor.
The resulting configuration should look like this:
# Card Vendor Chipset
DEVICE=eth0					# name of the interface
HWADDR=00:11:22:33:44:55			# MAC address of the interface
BRIDGE=br0					# name of the bridge
for eth1 it would look like:
# Card Vendor Chipset
DEVICE=eth0					# name of the interface
HWADDR=00:50:C2:AA:BB:CC			# MAC address of the interface
BRIDGE=br0					# name of the bridge
After you've done this for every interface you want to add to your bridge,
create a new file and name it 'ifcfg-br0'. The contents of this file should look like:
# BRIDGE
DEVICE=br0					# name of the interface
TYPE=bridge					# type of interface (bridge)
BOOTPROTO=static				# no DHCP, interface has a static IP
IPADDR=192.168.0.20				# IP address
NETMASK=255.255.255.0				# netmask
NETWORK=192.168.0.0				# network address
GATEWAY=192.168.0.1				# IP of your gateway / router
ONBOOT=yes					# bring up interface on boot
Of course you'll have to adjust the fields IPADDR, NETMASK, NETWORK and GATEWAY to the settings of your network.
If your trixbox retrieves its IP-Address from a DHCP-server, the file should look like this:

# BRIDGE
DEVICE=br0					# name of the interface
TYPE=bridge					# type of interface (bridge)
BOOTPROTO=dhcp					# use dhcp
ONBOOT=yes					# bring up interface on boot
- Reboot your trixbox server
The changes made above will take effect after you have rebooted your trixbox. Note that if you want to make
changes to the configuration of your bridge (e.g. change the IP), you should edit the file that contains
the configuration directly and NOT use the trixbox frontend since it will most likely break your
network bridge configuration.
If you are using DHCP in your network and want to assign a fix address based on the MAC of your
trixbox server, you should check the MAC of your bridge and configure your DHCP-server accordingly.
Assign an IP-Address to berofix
The default IP-Address of a berofix in default settings is 10.0.0.2 with 255.0.0.0. With proper network settings you can open a browser and login to the berofix and change the IP-Address via the web Browser. The other way to assign an IP-Address to the berofix is by using the bfdetect tool, which can be downloaded from the download section.
trixbox:wget www.beronet.com/downloads/berofix/bfdetect.tar.gz
trixbox:/usr/src# tar -xzf bfdetect.tar.gz
trixbox:/usr/src# cd bfdetect
trixbox:/usr/src/bfdetect/# make && make install
trixbox:/usr/src/bfdetect/#./bfdetect
Scanning network for bero*fix devices...

[1] mac:00:00:24:C7:51:14 ip:10.0.0.2

Select a device:
Select the device and change the IP-Address, netmask as well as the default gateway and save the configuration. In our example the berofix should get the IP-Address 172.20.22.105. After that the berofix card is ready to use and we can configure the rest via a web browser.
Configure the trixbox
Login to the trixbox WebGui with the default user/password (maint/password). In our example the trixbox has the IP-Address 172.20.18.18. We have already preconfigured 2 extension 101 and 102, which we will need in our further documentation. On the trixbox we have to configure 3 points.
- 1. Establish a SIP Trunk between the trixbox and the berofix
- 2. Configure an inbound rule
- 3. Configure an outbound rule
1. Establish the SIP Trunk between the trixbox and the berofix
To establish the SIP-Trunk you have to login as admin into the trixbox and go to the point PBX->PBX-Settings->Trunks, and add a new SIP-Trunk.
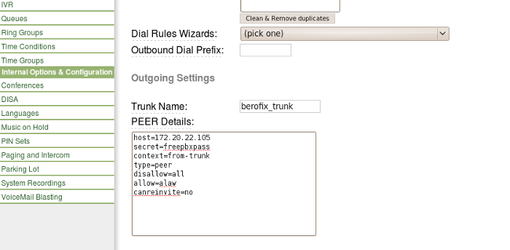
Under the Outgoing Settings we need to type the following settings. See picture below:
Trunk Name = berofix_trunk
host=172.20.22.105
secret=freepbxpass
context=from-trunk
type=peer
disallow=all
allow=alaw
canreinvite=no
Under the "Incoming Settings" delete everything from "User Context" and the "User Details", see picture below.
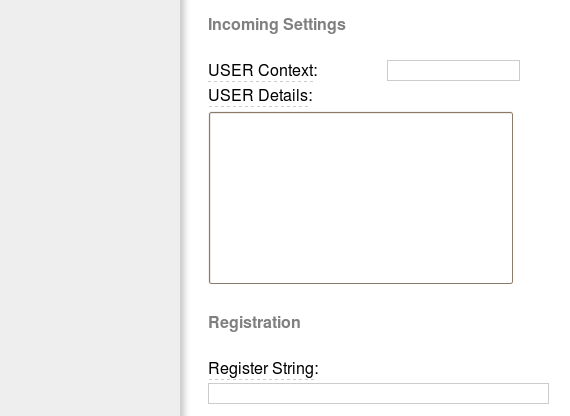
We don't need all the other settings, so you can leave them by default.
2. Configure an inbound rule
After we have created the SIP Trunk go ahead and create an inbound route. To do so go to PBX-PBX-Settings->Inbound Routes . See picture below.
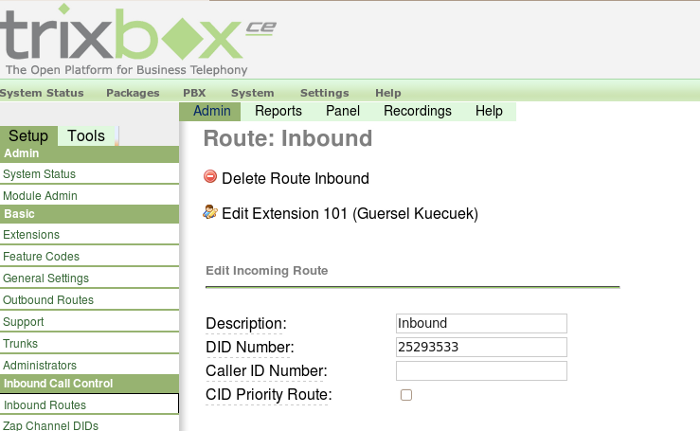
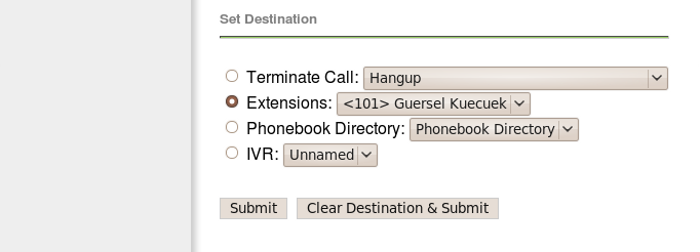
As you can see it is quite easy. The above mentioned route will match on 25293533 and route it to extension 101.
3. Configure an outbound rule
Create an outbound route by entering PBX-PBX-Settings->Outbound Routes . See picture below.
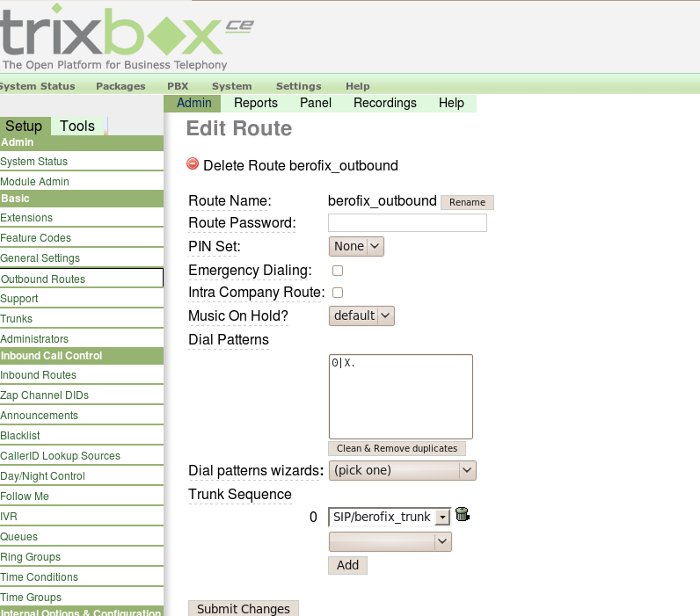
As you can see in the above picture every call originated from the trixbox starting with a prefix "0" will be routed to the SIP-Trunk "berofix_Trunk".
Configure the berofix
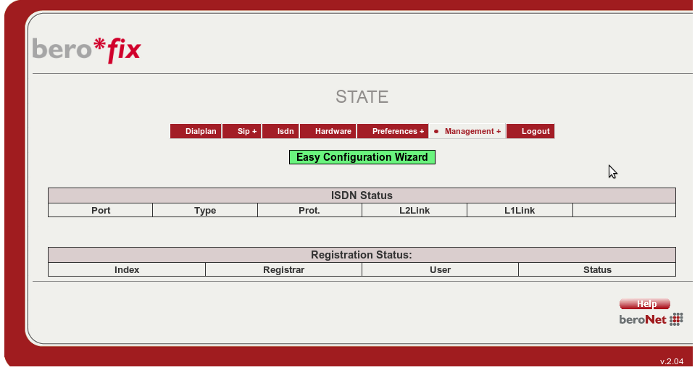
In our example we have assigned the IP-Address 172.20.22.105 to our berofix. Open your favourite browser and the URL http://172.20.22.105 and login to the berofix (default user/password is admin/admin). If your berofix device is in default settings, that means you haven't done any configurations, a green "Easy Configuration Wizard" will appear on the screen. If you don't see this button you have to reset the device to factory defaults (keep the IP-settings), after that the button will appear.
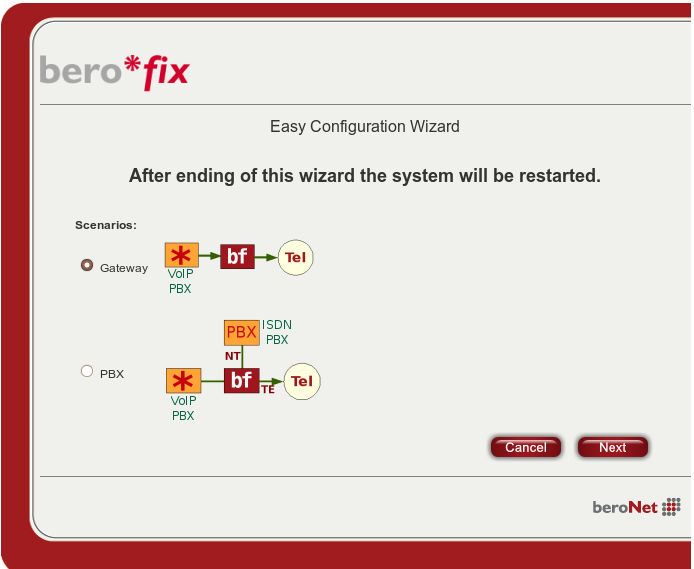
- After we have pressed the button we will see the next screen. Select your scenario and continue - in our case select the first one (Gateway scenario) and press next.
- In the next form you have to enter your values, in consideration to the sip connectivity, to the trixbox. See picture below.
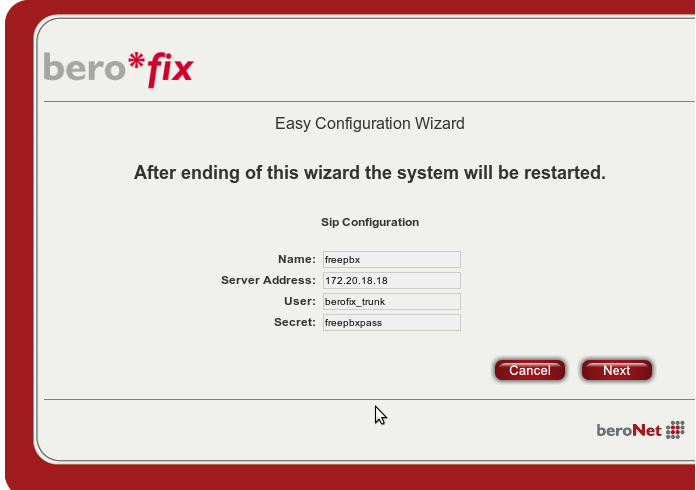
In our case we enter the following values:
Name:           freepbx -> this is only a label to identify it
Server Address: 172.20.18.18 -> the address of the trixbox
User:           berofix_trunk -> this has to match trixbox Trunk Name
Secret:         freepbxpass ->  this has to match with PeerDetails secret
- Before continuing to the next page we will have to make some settings for our PSTN connectivity, see picture below.

In our example we have a 4 Port BRI module plugged on our berofix, and we want to add Port 1 in a portgroup called te_ports with protocol PMP.
- After continuing you will see the summary of our configs, see picture below.

You have to confirm these settings by pressing the finish button. After that the card will reboot with the new configured values.
Test your settings
Make some testcalls in- and outbound and have fun.
If you need scheduled remote assistance, you can request our on-demand support services: https://www.beronet.com/support