Using a beroNet Gateway with "Gemeinschaft"
Howto Use beroNet Gateway with "Gemeinschaft" GPBX
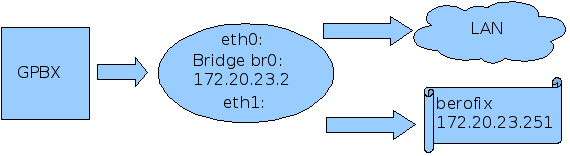
This small howto will describe you how to use a berofix Gateway card together with the “Gemeinschaft” PBX from Amooma (http://www.amooma.de/gemeinschaft/index.html). In this howto I have installed a Gemeinschaft PBX version 2.2.1 from the iso image on a standard i686 PC together with a berofix400 PCI card which has one bf4S0 module (4 BRI Ports). Due to the special design of the berofix card the operation system will detect it as a standard network card. The easiest and recommended way to configure this card is by using a bridge setup for the network. After this the berofix card will be in the same network as the “Gemeinschaft” PBX and all other VoIP devices. The reason why we do this is because of SIP-reinvites which are mandatory for T.38 and other services. So we have the “Gemeinschaft” PBX installed with the IP-address 172.20.23.250 on eth0. eth1 is our berofix card. The next steps we have to do is to put eth0 and eth1 in a bridge and give the bridge the ip-address 172.20.23.250. After that we have to change the IP-address of our berofix card to 172.20.23.251 like described in the following schema.
Setup the network
The “Gemeinschaft” PBX already have the network brirdging stuff in the kernel, so we don't have to do anything here. To setup the bridge we need to have the package “bridge-utils”.
gemeinschaft:~# apt-get update
gemeinschaft:~# apt-get install bridge-utils
After successfully installing this package we can modify our interfaces file under /etc/network/ like in the next example.
# This file describes the network interfaces available on your system
# and how to activate them. For more information, see interfaces(5).
# The loopback network interface
auto lo
iface lo inet loopback
# The primary network interface
auto br0
iface br0 inet static
address 172.20.23.250
netmask 255.255.0.0
gateway 172.20.0.1
bridge_ports eth0 eth1
Note that 172.20.23.250 is the IP-address of our “Gemeinschaft” PBX. Try to restart the network with /etc/init.d/network restart. If that fails just reboot the system. After coming up with the new network settings, our bridge should be established with eth0 and eth1. Check this with ifconfig and you should get an output for br0.
Assign an IP-address to berofix
The next step is to give our berofix card the new IP-address. This can be done by the bfdetect tool which can be downloaded from www.beronet.com.
gemeinschaft: wget www.beronet.com/downloads/berofix/bfdetect.tar.gz
gemeinschaft: /usr/src# tar -xzf bfdetect.tar.gz
gemeinschaft: /usr/src# cd bfdetect
gemeinschaft: /usr/src/bfdetect/# make && make install
gemeinschaft: /usr/src/bfdetect/#./bfdetect
Scanning network for bero*fix devices...

[1] mac:00:00:24:C7:51:14 ip:10.0.0.2

Select a device:
Select the device and change the IP-address, netmask as well as the default Gateway and save the configuration. After that the berofix card is ready to use and we can configure the card via a web browser.
Integrating berofix in “Gemeinschaft”
To integrate berofix in "Gemeinschaft we have to add a new Gateway group, add a new SIP gateway and make some Routing rules for inbound and outbound calls.
Add a new Gateway group
To add a new Gateway group go to the menu point Routes->Gateway groups and add a new one like described in the below picture.
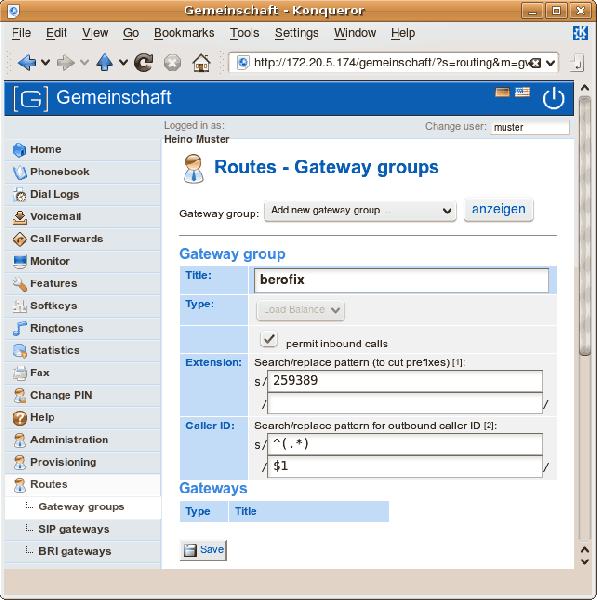
As title you can use "berofix" and make sure "allow inbound calls" is checked. All inbound calls routed from the berofix will be signaled with the beroNet basenumber 259389. This prefix we have to cut because “Gemeinschaft” is expecting the DID without the basenumber (see example above). The CallerID is generated by the “Gemeinschaft” PBX and we don't have to do anything here.
Add a new Sip gateway
After successfully added the Gateway group we have to add a SIP Gateway and assign it to the Gateway Group "berofix". Under Routes-> SIP Gateways you have to add a new SIP gateway like shown in the next figure.
![]()
As title we use BRI_TE, Host is the IP-address of our berofix in this case 172.20.23.251. Of course we have to allow outbound calls and we assign this SIP Gateway to our Gateway group berofix. Username and password should be left blank because we want to use the berofix as Proxy and not as registar(berofix can not be a registar).
Routing
We have to set some route for outbound and inbound dialing. Under the menu point Routing & LCR you should add an entry for outbound dialing, shown in the next figure:
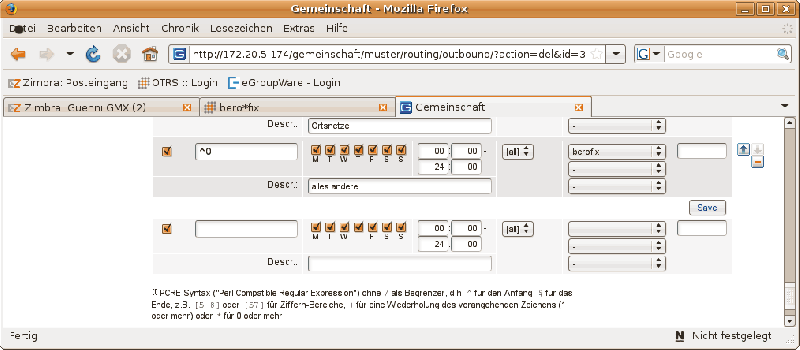
Note that everything start with a “0” should be routed to the Gateway group "berofix".After adding the Gateway group, the SIP Gatway and the Routing entries, the configuration from the “Gemeinschaft” side is ready. We now have make the corresponding settings on the berofix side.
berofix Configuration for "Gemeinschaft"
To make berofix work with the "Gemeinschaft" we need to set some corresponding values. To do so we have to set ISDN Ports,adding a ISDN group, configure the SIP settings and finaly create a Dialplan.
Configure the BRI ports
To configure the our 4 BRI Ports from our berofix we have to login to the card via http://172.20.23.251 with default username admin and password admin. Go to the menu point Hardware and select the detected bf4s0 module. After that you should see the following picture.
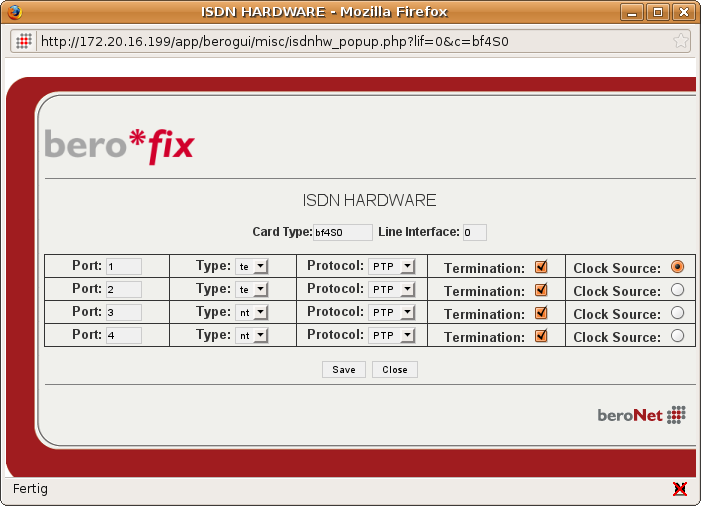
We configure Port 1 and 2 as TE PTP with Port1 as clock source.
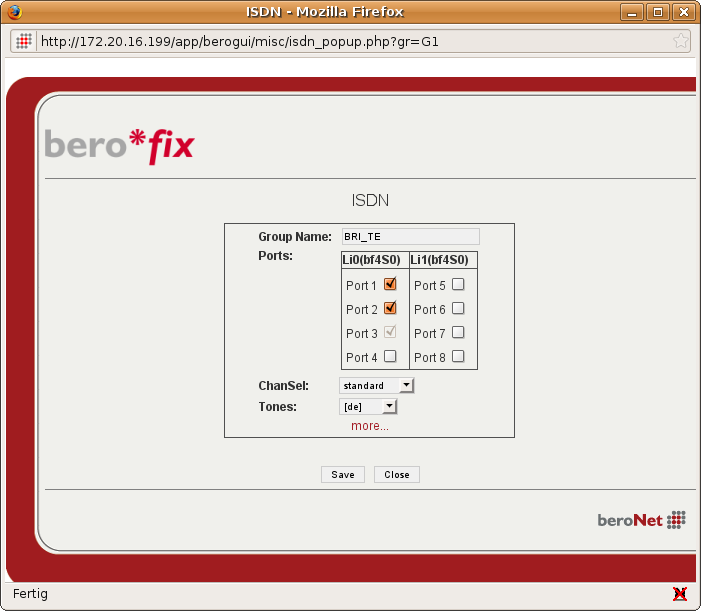
Adding a ISDN port group
To add a new ISDN port group we have to go to the menupoint ISDN and add a new ISDN port group. We call the new group BRI_TE and add Port 1 and Port2 in this group. See next figure.
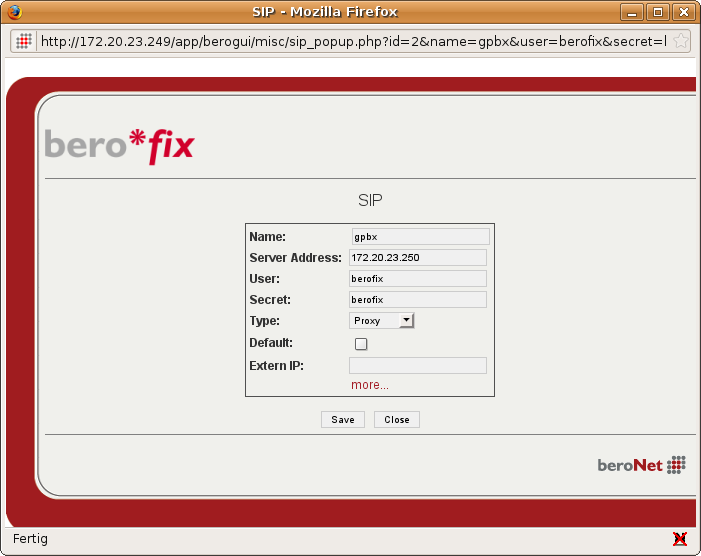
Adding a SIP account
Next got o SIP and add a new SIP entry with the follwing settings
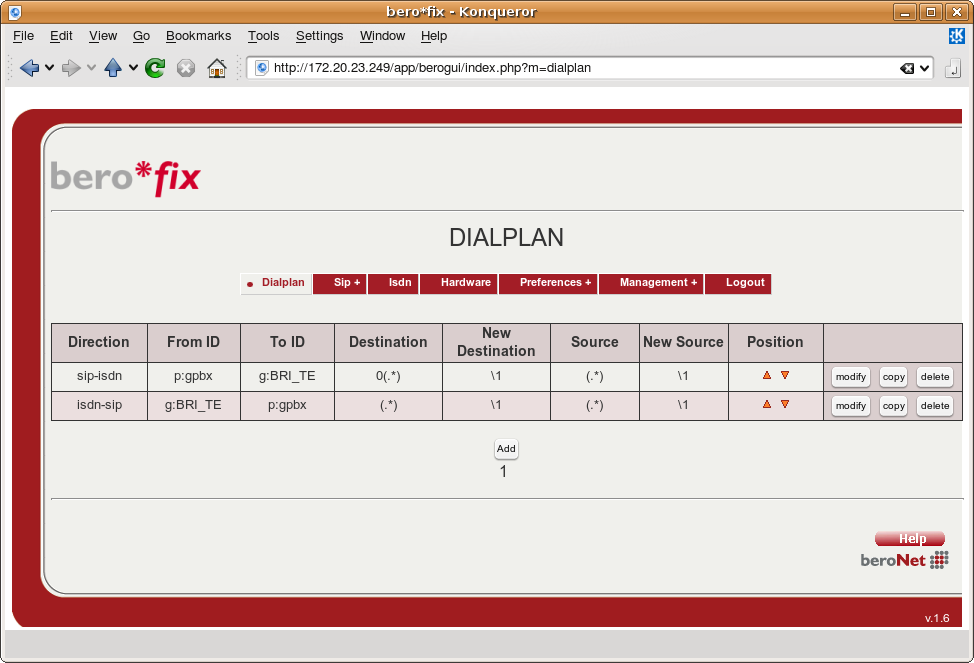
Creating new Dialplan entries
Last but not least we have to create two new Dialplan entries, one for inbound calls and one for outbound calls.
Inbound Rule: Direction: ISDN-> SIP From ID: g:BRI_TE To ID: p:gpbx Destination: (.*) New Destination: \1 Source: (.*) New Source: \1
Outbound Rule: Direction: SIP-> ISDN From ID: p:gpbx To ID: g:BRI_TE Destination: 0(.*) New Destination: \1 Source: (.*) New Source: \1
Note that we have to cut the prefixes “0” while dialing out. If everything was successful it should lokk like the next figure.
If you need scheduled remote assistance, you can request our on-demand support services: https://www.beronet.com/support