Installation and configuration of Elastix on the beroNet VoIP Appliance
Installation of Elastix on the beroNet Appliance
Download Elastix VM
In the web interface of the beroNet appliance, go to "Virtual Machines+ → Market". There you can download the ISO of Elastix. If you wish to install a newer version, download it from the Elastix website and upload the ISOs from the menu "Manage ISO".

Create Elastix VM
One the ISO has been downloaded, go to "Virtual Machines+ → Manage VMs" and click on the green button "New+" in order to create a new VM.

Choose the right settings for your VM depending on the number of extensions you wish to connect to it and the number of calls you want to make. In my case, I give it 1 CPU, 1 Gb of RAM (we can add more later) and 10 Gb of SSD (an extra disk can be later added to the VM). You can secure the VNC access with a password. Finally don't forget to choose the Elastix ISO as boot device. Click on create to finalize the configuration.
You're Elastix virtual machine has been created. A few extra parameters can be set in the tabs System, Network, Disks and Other.

In System, make sure the "boot-device" is "d (ISO)". We will change it to "c (Disk) once the installation is finished.
In Network you can choose the number of network card that the Elastix VM will detect: either one with the NIC-mode "lan" or two with "lan-wan". You can also choose if they should be recognized as "Intel" or "realtek" cards.
In Disks you can manage the partitions of your VM: you can add / delete them.
In Other you can choose a VNC display for the VM, change the password of the VNC, choose the keyboard configuration and set different options.
Finally, click on "start" in order to begin the installation of the ISO. Once it has started, click on "Connect to Screen" or "Screen in new window" to proceed with the installation.

Follow the ISO installation of the Elastix IPBX. Don't forget to write your login and password somewhere, you will need them.
Finalize VM creation
Once the installation is finished, power off the VM and navigate to the "System" tab. Change the boot device to "c (disk)". If the option is not changed, the ISO will be installed each time the VM reboots.

You can now start the configuration of the Elastix via its web interface. To find out the web interface of the IPBX, start the VM and click on its "Web-VNC" button. You will have the possibility to login with the credentials you set during the installation. The IP address will then be shown:

In my case, the IP is 172.20.5.37
Configuration in the Elastix
To connect ISDN or analog lines to Elastix, we first need to configure a SIP trunk and then create rules using it.
Adding a SIP trunk in the elastix
To add a SIP trunk, navigate to "PBX → PBX Configuration → Trunks" and click on "Add SIP Trunk".

Some fields are compulsory, others are not. The most important part of the configuration is the "Peer Details". Here is an example of my configuration.
General Settings:

Trunk name: put a name of your choice.
Outbound CallerID: you can either choose to set the outbound callerID here or in the outbound rule you will create after. In my case, I prefer to use it in the rule and I therefore choose "Allow Any CID" in the "CID Options" field.
Outgoing Settings

Here is a description of the "Peer Details":
type= choose "peer" in order to be able to set the callerID right.
nat= in my case I was not using a "NAT".
username= the username used to register Elastix with the beroNet VoIP Gateway. This information will be used in the gateway configuration.
secret= the password used to register Elastix with the beroNet VoIP Gateway. This information will be used in the gateway configuration
host= IP address of the gateway
To find more information regarding those settings, visit this page.
On the beroNet Gateway side, a SIP account has been created. It uses the same information:

In order to be able to receive calls from this trunk, the same information need to be added in the "incoming settings" as shown below:

Create rules using the trunk
Two rules need to be created: an outbound rule to call out and an inbound rule to receive calls from the beroNet VoIP Gateway.
Outbound rule
To create an outbound rule, navigate to "PBX → PBX Configuration → outbound rule".

Route settings

Give the route a name and a CID. If you choose to "override Extensions", then only the number you enter in "Route CID" will be sent and presented. Otherwise, you can choose to present the CID configured in each extension.
Dial Patters that will use this Route
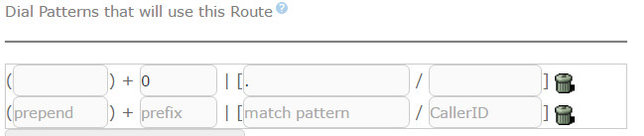
Here you can choose when calls will be routed to this specific rule. In my case, calls starting with 0 are sent to it.
Trunk Sequence for Matched Routes
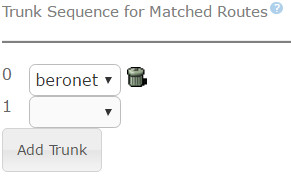
Finally, don't forget to select the previously created SIP trunk as "Trunk Sequence".
Finish the configuration by clicking on "Submit changes" and applying the configuration.
Inbound rule
An inbound rule needs to be created in order to receive calls from the beroNet VoIP Gateway. To create an inbound rule, go to "PBX → PBX Configuration → Inbound Call Control → Inbound Routes".
A few fields are important and need to be configured:

The DID Number is the number which needs to be called for this route to be applied.
You also need to Set a destination. In his case, it could for example be a call queue of which different members of the team are part.

Configuration of the gateway
Finally, the gateway needs to be configured in order to send calls coming from its PSTN ports to the Elastix. Follow our guide in order to configure your beroNet VoIP gateways.
If you need scheduled remote assistance, you can request our on-demand support services: https://www.beronet.com/support