| Table of Contents |
|---|
...
Product Manual
| Child pages (Children Display) | ||
|---|---|---|
|
Hypervisor and Guides
About the beroNet Telephony Appliance
The beroNet Telephony Appliance is the ideal hardware platform for customers and technology integrators, looking for a reliable hardware solution
...
with integrated ISDN, Analog and GSM connectivity or your voice-only setup, making the switch to All-IP not only possible but easy.
The beroNet Telephony Appliance’s elegant design delivers superior energy efficient properties and is designed specifically for the rigorous 24/7 uptime demand of modern telephony systems. With a power consumption of less than 24W during normal operation, over 200 EUR can be saved in electricity costs per year compared to other servers.
With its fanless design and
...
harmonised components, the beroNet Telephony Appliance is the suitable solution for all kinds of telephony projects. The beroNet Telephony Appliance is designed for telephony applications in the SOHO and SME markets and is perfectly suited for businesses with up to 60 concurrent calls.
Virtualising with the beroNet Hypervisor
The most amazing feature
...
of the Telephony Appliance is the beroNet Hypervisor, which allows the user to run
...
multiple virtual machines and applications simultaneously.
A PBX,
...
a fax-server and firewall can run on the same hardware platform and be maintained
...
and managed via the Web-GUI. The appliance is the embedded low power
...
datacenter for your office.
The beroNet Hypervisor is built on the Alpine embedded Linux with the XEN Kernel
...
, which allows the hypervisor to
...
run on minimum resources, giving almost all resources to the virtual machines. The hypervisor only requires 2GB of disk space and
...
Physical Setup
The appliance has several connectors for different tasks.

The minimal Setup requires only 2 cables:
* power adapter to the 12V DC Jack
* LAN cable connected to LAN
After pushing the power button, you should hear a beep and the appliance should boot up.
Network Setup
After powering up and after a few seconds the appliance should receive an IP Address from your local DHCP Server. There are several ways to obtain the IP Address of the Hypervisor:
- Windows Network Discovery
- bfdetect
- search through DHCP Server logs
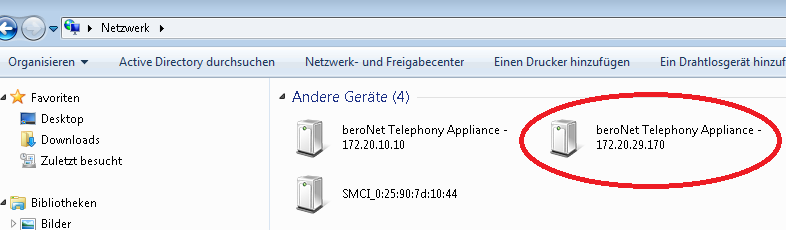
Windows Network Discovery
The windows built in network discovery tool should find the beroNet appliance. It shows an icon and the IP of the appliance. By double clicking you will be forwarded to the Hypervisor webinterface.
bfdetect
Another option is bfdetect. With bfdetect you can discover the appliance via the windows or linux command line. bfdetect shows the serial Number, the Hypervisor Version, the MAC address and the IP Address of the Appliance. The following bfdetect output shows an appliance and a gateway. The Appliance Serial-Numbers start with 20 followed by the amount of RAM and finally by the serial itself.
| Code Block |
|---|
Please wait, while we're scanning on all interfaces for beroNet devices...

  1) serial:   20-16-0000000004         type: Appliance         appfs: 0.2                              mac: 00:13:3b:10:08:48  ip: 172.20.10.10
  2) serial:    2-16-0000012238         type: Gateway           appfs: 3.0.03-Phone-Detect-rc001.       mac: d8:df:0d:00:22:e8  ip: 172.20.10.9

Please, select a device (enter 'q' to leave): |
With bfdetect you can also switch from DHCP to a static IP which can be set manualy, by choosing the index of the device and then following the configuration steps.
beroNet Hypervisor Webinterface
As soon as you have accessed the Hypervisor Webinterace you can login with the default credentials:
- user: admin
- pw: beronet
...
1GB of Memory.
...