beroNet OS Web Interface (firmware 23.01)
- Milon Schulz
Getting Started
Change Your Password!
The first thing to do is to login with the default credentials on your device:
Username: admin
Password: admin
Please make sure to change the default credentials, to avoid malicious attacks. You can change the admin password at Preferences → Security or by clicking on the link of the warning message.
The password has to have at least 5 characters, containing at least: one uppercase, one lowercase, one special character (e.g. !#*+!§$%&/()=?) and one number.
The Activate Button / Graceful Activate
Changes made in the GUI do not apply immediately. Depending on the type of change different kinds of "activate" buttons appear:
 → Full Reboot of the Gateway. Takes several seconds to minutes. (hardware and network settings)
 → Restart of ISGW. Takes several seconds. (PSTN Settings)
 → Applies immediately without call drops. Takes just a few moments. (SIP, Dialplan and Cloud settings)
Only after clicking on the activate button, the changes apply. It is useful to make the needed changes and activate them all at once the configuration is done.
If there are currently active calls going on, you can activate graceful. This will periodically check for active calls and will perform the activate or restart as soon as there are no active calls left.
Header
In the you can quickly change between the GUI-Mode, the Language and have the status of your beroCloud registration.
- You can visit your beroCloud settings by clicking on the link to beroCloud or in the navigation bar above.
- You can change the GUI-Mode to Advanced, giving you more specific options throughout your gateway.
- You can choose between English or German.

Configuration path
To configure a beroNet Gateway there are a couple of steps to do. In most cases the configuration starts at Hardware, where the physical parameters of each port are configured. The next step is to group the PSTN ports in PSTN that need to be used. Then SIP Accounts are created under SIP. Finally the different entities are connected in the Dialplan. The Dialplan defines, which calls should be forwarded from SIP to PSTN and vice versa, based on criteria like the dialed number or the CallerID. So the common steps are:
Hardware Settings
PSTN Groups
SIP Accounts
Dialplan Rules
Optionally one of the Configuration Wizards can be used for many scenarios.
Call Handling
Calls are handled by the ISGW service, which is configured through the WebGUI or through provisioning. The ISGW communicates to the hardware through drivers. Every module has a separate hardware driver which has different settings depending on the type of technology. These settings can be configured in the Hardware section.
The physical connections are called ports. ISGW needs to initialise all the ports it should use, this can be configured by putting the ports into PSTN groups.
The next step is to create SIP Accounts and finally the Dialplan rules define how the calls should be routed by ISGW.
PSTN → Hardware
The modules are connected on the beroNet device to a flexible TDM Backplane, which allows sharing of synchronization clocks and bridging of audio-channels between modules and across devices which are connect via the PCM cable.
The hardware section in the webGUI allows to understand which modules are present, to change the synchronization settings and to change technology related settings.
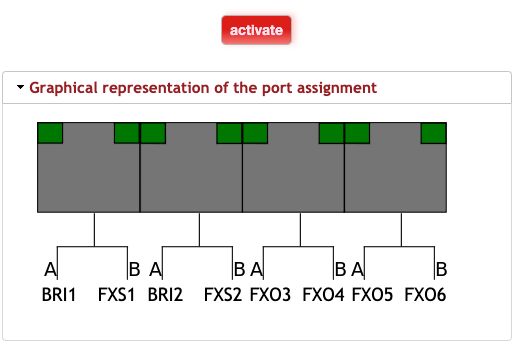
Here you can see the graphical presentation of the interfaces (in this case BFT-Adapters are required to access all the technologies) and the types of modules that are installed.
Every change in the hardware section requires a red Activate which yields to a reboot of the device.
Synchronization
It is critical to understand how the synchronization between the different ports, modules and devices should be configured to achieve the highest possible quality for the use case.
In most cases there should be a single synchronization source for one or more beroNet devices. The best results are achieved when receiving the synchronization from an external ISDN Provider through one BRI or PRI port. This synchronization can be shared with the other ports on the same module and with the other modules on the devices and also with another device and its modules via the PCM cable.
If no external synchronization is available, each module can create its own timing. Also in this scenario one module should be chosen as timing source and all the other modules and devices should receive their synchronization from this module to provide a shared timing.
Only in very rare cases it might be necessary to have separate synchronization sources on the same device with 2 modules. This might be the case when 2 different ISDN providers are used which have separated timing sources.
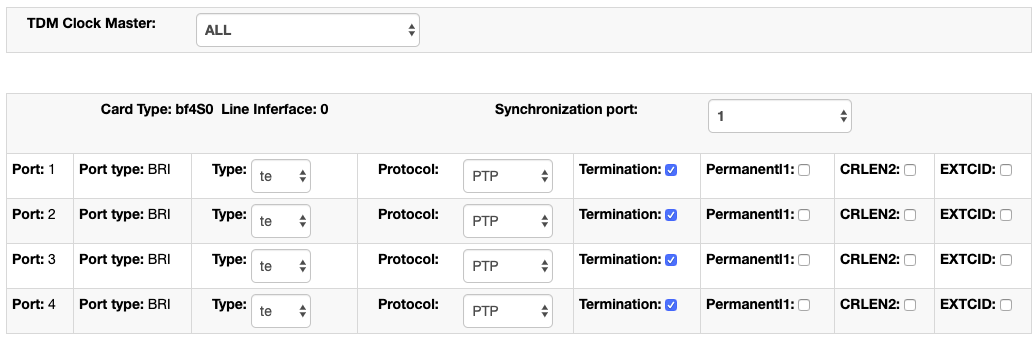
TDM Clock Master:
Defines which module should be clock master for all other module slots All other modules will derive their timing from the clock master.
- ALL - each module is clock master for itself.
- PCM - the external PCM Connector is clock master, so another beroNet gateway provides the timing.
Thus no synchronization port needs to be defined here. - lif0-XXX - the first module is the clock master.
- lif1-XXX - the second module is the clock master.
- lif2-XXX - the third module is the clock master.
The FXS, FXO, LTE and GSM modules can not derive their timing by their interfaces, because these technologies do not provide timing sources. These modules always have a local oscillator to create a timing if they are configured to be TDM Master.
The ISDN modules can receive their timing from the ISDN Provider. Since they have multiple ports it is necessary to define which port should be used a primary synchronization source.
Alternatively they can be set to Crystal, therefore giving their own timing.
ISDN Settings
Type: Each ISDN Port can be configured separately. The port can be set to te or nt mode.
The type defines whether the device will be te to be connected to an ISDN provider, or whether the port should be nt to be connected to a traditional ISDN PBX. The TE mode is mostly used when an IPBX should be connected to the ISDN network and the nt mode if a traditional PBX needs to be connected to a VoIP Provider. When switching the port from te to nt, the module switches the transmit and receive pins, so that no cross-over cable is required.
Protocol: The protocol can be PTP (Point-to-Point) or PMP (Point-to-Multipoint).
The other settings are more specific and do not require changing in most cases.
The Line Termination can be enabled and a permanent layer 1 timer can be started.
Furthermore you can set the ISDN call reference value IE to have a length of 2 instead of 1 with CRLEN2 and with EXTCID, you can set the ISDN Caller-ID IE to a length of 3 instead of 1.

Analog Settings
FXS
When using FXS analog modules (i.e. BF4FXS) you have the following option:

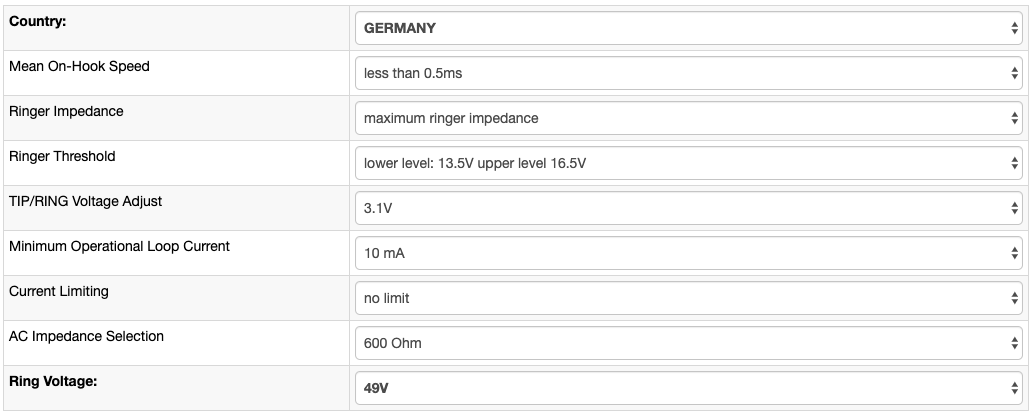
You can choose between 49V and 89V ring voltage.

FXO
When using FXO analog modules (i.e. BF4FXO) you can set each country with own settings in terms of signals and tones.
(For Germany 1TR110_DE is often used.)
PCM Settings
When the PCM Master bridging is enabled the gateway is the PCM-Master (That means this module will generate the clock for all other slaves).
You need to connect a PCM-Slave beroNet Gateway with a PCM cable via the PCM connector to enable the bridging between master and slave.

On the slave you need to set the Master Settings on all line interfaces to "slave". Then paste the IP-address of the master beroNet Gateway into the slave its PCM-Master IP-address field.

PSTN
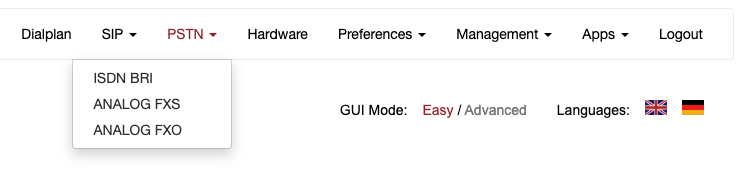
The menu point PSTN gives you an overview about the ports which are provided by the installed modules you are using on this particular beroNet device.
For each technology you will find a sub menu point, like
- ISDN PRI
- ISDN BRI
- ANALOG FXO
- ANALOG FXS
- LTE
- GSM
The sub menu entries are dynamic, and you will only see these which are provided by your modules. These sub menu points or technologies can be grouped together in so called Port-Groups.
As you can see in the picture below, you can add, modify and delete 'Port-Groups' by clicking on the corresponding button.
You can also find the Hardware page here, which is documented in the part above.
ISDN PRI/BRI options
General ISDN PRI/BRI settings
The picture below shows you ISDN PRI / BRI 'Port-Groups' specific basic settings:
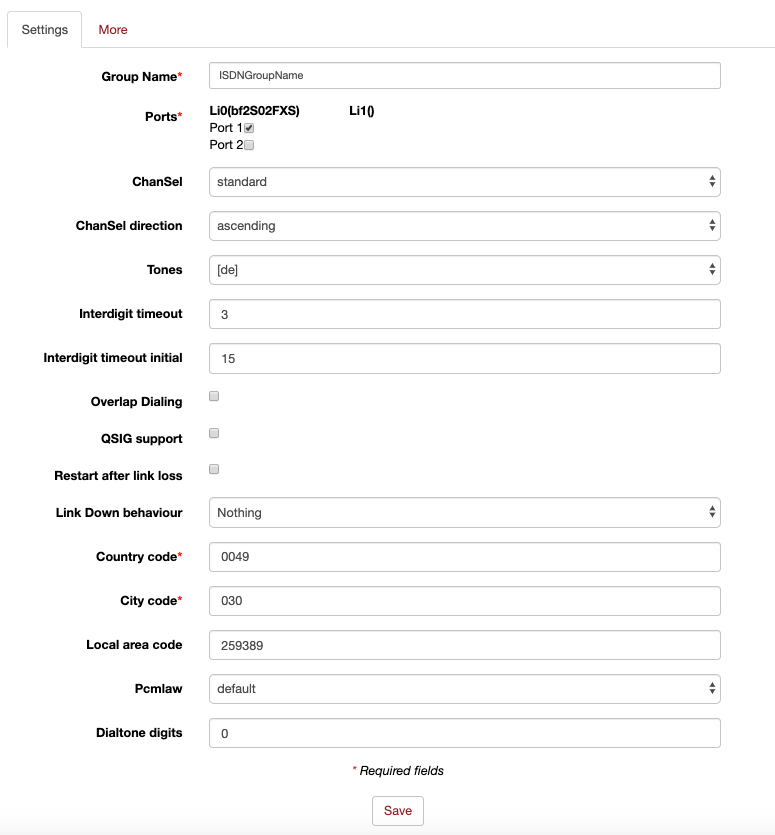
Group Name
Unique name of the 'Port-Group'
Ports
Ports should be added to the 'Port-Group'
ChanSel
Channel Selection schemes: (Standard / Random / Round Robin) default: Standard
Standard - selects the next free channel in ascending order
Random - selects the next free channel at random
Round Robin - selects the next free channel base on the Round-Robin principle
Tone
ISDN Tones are categorised by country
Interdigit timeout
For every incoming call a interdigit collect timer will be started. After this specified timeout, without getting a digit, the call will be processed to the Dialplan.
Note: This Timer is only started if 'Overlap Dialing' is deactivated. (Default: 3 sec.)
Interdigit timeout initial
This Timer is the initial interdigit timer, that means before we got any digit. This Timer will be stopped after the first digit and the above mentioned Interdigit Timeout Timer will apply.
During this time a dial-tone will be generated. Note this Timer is only started if 'Overlap Dialing' is deactivated. (Default: 15 sec.)
Overlap Dialing
This Option will activate real Overlap Dialing, for instance in ISDN Environments. By activating this option the 'Interdigit' as well as the 'Interdigit timeout initial' Timer will be deactivated.
QSIG support
Enable or disable QSIG support
Link Down behaviour
In some countries like Cyprus the behaviour of ISDN PTP ports regarding Layer1 and Layer2 is different. They deactivate Layer 1 and Layer 2 after a while of inactivity.
With this option you can solve this issue.
Nothing - default
Pull Link Up (2s) - will try to get UP Links up to 2 seconds
Pull Link Up (once) - will try to get UP Links once
Country code
Country calling code with leading 00 or +, e.g. 0049 +49 for calling Germany
This field is required if you set new_source_auto for oad (Caller-ID)
City code
City calling code with a leading 0, e.g. 030 for calling Berlin
This field is required if you set new_source_auto for oad (Caller-ID)
Local area code
Local calling code e.g. 2593890 calling beroNet
This field is required if you set new_source_auto for oad (Caller-ID)
Pcmlaw
Codec setting
Default: using alaw except T1
alaw: using G711-alaw
ulaw: using G711-ulaw
Advanced ISDN PRI/BRI configuration (More)
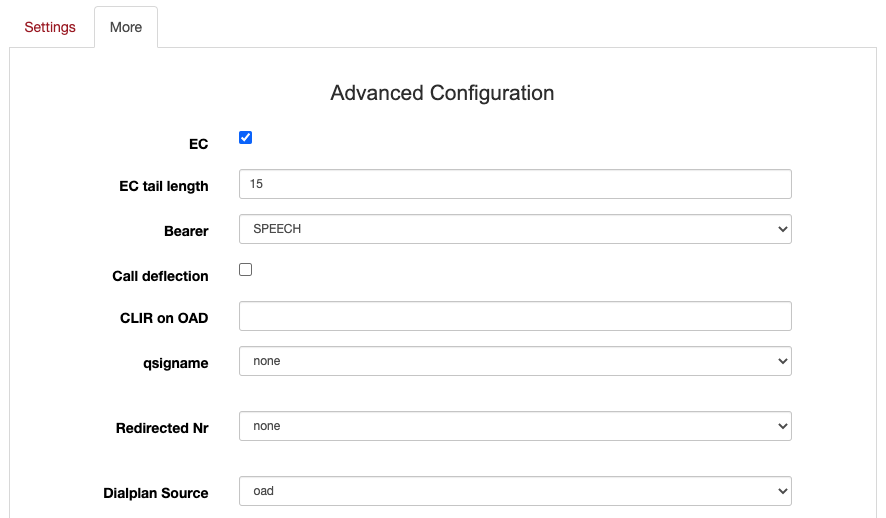
EC
This will activate or deactivate the onboard Hardware Echo canceler. default: on
EC tail length
EC tail length [0=8ms,1=16ms,2=24...,15=128ms] (default value is 15=128ms) 16 tabs each 8ms.
Bearer
ISDN Bearer capability to use for outbound calls on this 'Port-Group' speech (default for standard Voice calls) Audio_3.1K (useful for outbound Fax calls) Audio_7K Video Digital_Unrestricted (useful for ISDN digital calls) Digital_Restricted Digital_Unrestricted_Tones
Call Deflection
Call deflection is used to redirect calls on the provider site without using B-Channels on the berofix. If 'Call deflection' is enabled you can use SIP 302 'Move temporarily' to redirect the call on the provider site.
CLIR on OAD
useful for dynamically hide the CallerID in direction of this 'Port-Group' (ISDN). For instance if before detects a call to this 'Port-Group' at which the OAD corresponds with CLIR_on_OAD (after the call left the dialplan), the CallerID will be hidden. That means the remote end doesn't see it. default: empty
Redirected Nr
Defines what the Redirected Nr field should contain. This is usually not needed. (Default: none)
Dialplan Source
The Dialplan Source is used as 'Source' for matching in the 'Dialplan'. That means if a call is initiated from this 'Port-Group' you can use 'Dialplan Source', to tell the Dialplan, which value should be used for the 'Source' in the Dialplan.
Dialplan Source can have the following values OAD:
- auto (This setting checks will automatically choose the settings it thinks is best. Usually oad, but in the case that it is empty, it will choose one of the other)
- oad (default)
- oad2 (oad2 in case you have 2 oad's you can choose with which value you want to use to match with the Dialplan)
- Qsigname (Qsigname to use it at source in the Dialplan)
- Redirected_nr (redirected number)
DAD-Settings

The dad (Callee ID) gives you the possibility to tell the beroNet Gateway, which field should be used for the DAD for calls to this 'Port-Group'. DAD (Callee ID) can use the the following fields:
new_destination_auto (use new_destination from the dialplan as DAD and apply the appropriate formatting for calls to this 'Port-Group')
new_destination (use new_destination from the dialplan as DAD for calls to this 'Port-Group')
to_user (use SIP to_user as DAD for calls to this 'Port-Group')
to_display (use SIP to_display as OAD for calls to this 'Port-Group')
request_uri_user (request and use SIP to_user as DAD for calls to this 'Port-Group')
manual (use a constant string as dad for calls to this 'Port-Group')
dad(Type of number)
It's the 'Type of Number' in terms of ISDN for the Destination Address (DAD). The option defines the number format of the DAD for an outgoing call. Be aware that the remote end has to also support this feature. unknown, international, national, local, subscriber alphanumeric, abbreviated
OAD-Settings
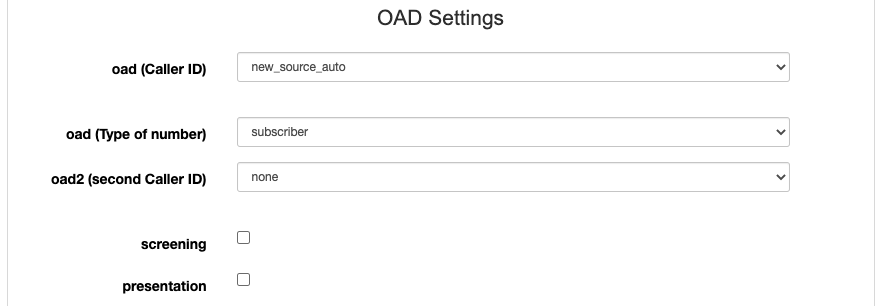
The oad (Caller ID) gives you the possibility to tell the beroNet Gateway, which field should be used for the OAD for calls to this 'Port-Group'. OAD (Caller ID) can use the following fields:
new_source_auto (use the new_source from the dialplan as OAD and apply the appropriate formatting for calls to this 'Port-Group')
new_source (use new_source from the Dialplan as OAD for calls to this 'Port-Group')
from_user (use SIP from_user as OAD for calls to this 'Port-Group')
from_display (use SIP from_display as OAD for calls to this 'Port-Group')
pai_all (use P-Asserted-Identities as OAD for calls to this 'Port-Group')
pai_user (use the P-Asserted-Identity user part: "berofix" <sip:gateway@beronet.com>)
pai_display (use the P-Asserted-Identity display part: "berofix" <sip:gateway@beronet.com>)
ppi_all (use P-Preferred-Identities as OAD for calls to this 'Port-Group')
ppi_user (use the P-Preferred-Identitiy user part: "berofix" <sip:gateway@beronet.com>)
ppi_display (use the P-Preferred-Identity display part: "berofix" <sip:gateway@beronet.com>)
rpi_all (use Remote-Party-ID as OAD for calls to this 'Port-Group')
rpi_user (use the Remote-Party-ID user part: "berofix" <sip:gateway@beronet.com>)
rpi_display (use the Remote-Party-ID display part: "berofix" <sip:gateway@beronet.com>)
none (use nothing for the OAD)
manual (use a constant string as OAD for calls to this 'Port-Group')
oad (Type of Number)
Type of Number'TON' is in terms of ISDN for the Originating Address (OAD). This options defines the number format of the OAD for an outgoing call. If you want to use 'CLIP_NO_SCREENING' you have to set this to international, national local subscriber alphanumeric, abbreviated depending on how you are going to send your OAD.
A deeper explanation on how these ISDN and SIP attributes are connected and what they do can be found here: How to modify what goes into From/P-Preferred-Identity/Callerid.
screening/presentation
screening/presentation these are the exact ISDN screening and presentation indicators. default: off screening: off and presentation: off means the callerID is presented but not screened (the remote end does see the callerID) screening: on and presentation: on means callerID presented but screened (the remote end does not see the callerID)
Additional configuration options
The below Box 'Additional configuration options description' contains the possible settings including a small description. You have to enter the setting in the upper box line by line as shown in the picture below.
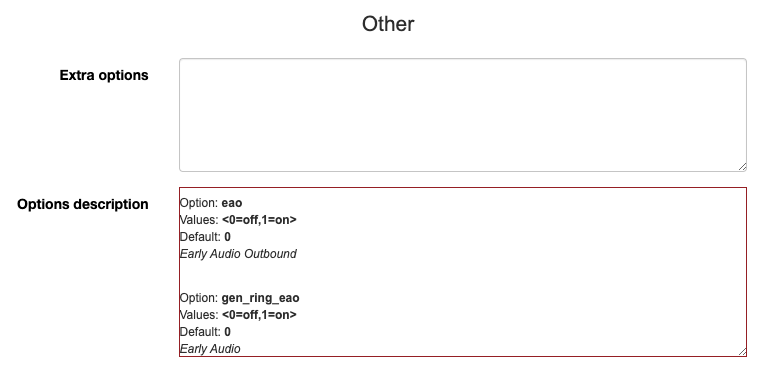
Analog FXO options
General analog FXO settings
The picture below will show you analog FXO 'Port-Group' specific basic settings.
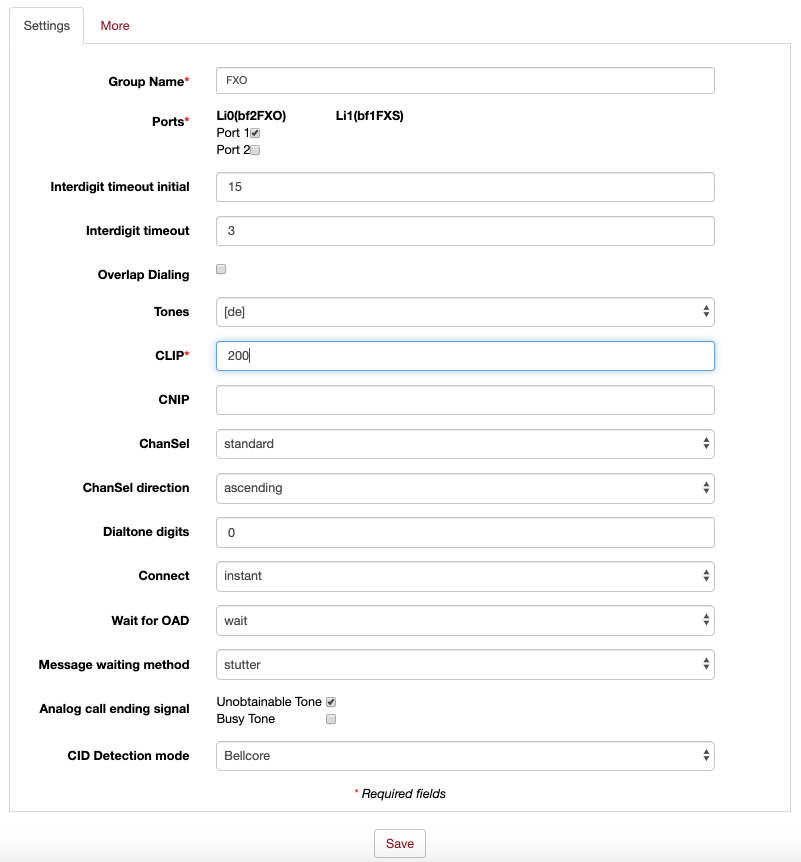
Ports
Ports which have been added to the 'Port-Group'
Interdigit timeout
For every incoming call a interdigit collect timer will be started. After this specified timeout, without getting a digit, the call will be processed to the Dialplan. Note: This timer is only started if 'Overlap Dialing' is deactivated. d default: 3 sec.
Interdigit timeout initial
This Timer is the initial inter digit timer, that means before we got any digit. This Timer will be stopped after the first digit and the above mentioned Interdigit timeout timer will apply. During this time a Dialtone will be generated. Note this Timer is only started if 'Overlap Dialing' is deactivated. (default: 15 sec.
Overlap Dialing
This option will activate real Overlap Dialing, for instance in ISDN environments. By activating this option the 'Interdigit' as well as the 'Interdigit timeout initial' timer will be deactivated.
Tones
Tone sets which are categorised by country
CLIP
To allocate a number for this 'Port Group' that you can use as destination in the Dialplan.
CNIP
To allocate an alphanumeric number for this 'Port Group' that you can use as destination in the Dialplan.
Chan Sel
Channel Selection schemes: (Standard / Random / Round Robin) default: Standard Standard - selects the next free channel in ascending order Random - selects the next free channel at random Round Robin - selects the next free channel base on the Round-Robin principle
ChanSel direction
Ascending or descending direction of the channel selection
Connect
How beroNet Gateway should detect an FXO connect instant (after dialing the state will immediately change to 'connect') polarity (the opposite site send a polarity reversal to detect a 'connect') default: instant
Wait for OAD
wait (default: wait 2sec. to detect the OAD) dontwait (will immediately process without waiting for the OAD)
Dialtone passthrough
default: disabled
Analog call ending signal
the kind of signal must be detected to finish the call. unobtainable tone busy tone
CID Detection mode
The caller ID standard is determined by this setting. Bellcore ETSI ETSI-DTMF-AFTER_RINGING
Advanced Configurations
The picture below will show you analog FXO 'Port-Group' advanced basic settings.
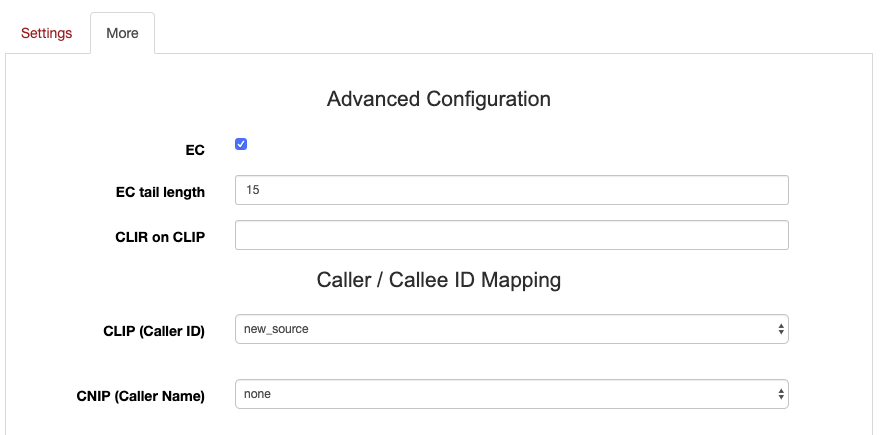
EC
This will activate or deactivate the onboard Hardware Echo canceler. default: on
EC tail length
EC tail length [0=8ms,1=16ms,2=24...,15=128ms] (default value is 15=128ms) 16 tabs each 8ms.
CLIR on CLIP
To dynamically hide the CallerID in direction of this 'Port-Group' (FXO). For instance if berofix detects a call to this 'Port-Group' with a CLIP value correlates with a CLIR_on_CLIP value (after the dialplan), the CallerID will be hidden, that means the remote end doesn't see it.
CLIP (Caller ID)
The CLIP (Caller ID) gives you the possibility to tell the Gateway, which field should be used for the CLIP (Caller ID)
CNIP (Caller Name)
The CNIP (Caller Name) gives you the possibility to tell the Gateway, which field should be used for the CNIP (Caller Name)
CLIP/CNIP could be applied to the following fields:
new_source (use new_source from the Dialplan as CLIP/CNIP for calls to this 'Port-Group')
from_user (use SIP from_user as OAD for calls to this 'Port-Group')
from_display (use SIP from_display as CLIP/CNIP for calls to this 'Port-Group')
pai_all (use P-Asserted-Identity as CLIP/CNIP for calls to this 'Port-Group')
pai_user (use the P-Asserted-Identity user part: "berofix" <sip:gateway@beronet.com>)
pai_display (use the P-Asserted-Identity display part: "berofix" <sip:gateway@beronet.com>)
ppi_all (use P-Preferred-Identity as CLIP/CNIP for calls to this 'Port-Group')
ppi_user (use the P-Preferred-Identitiy user part: "berofix" <sip:gateway@beronet.com>)
ppi_display (use the P-Preferred-Identity display part: "berofix" <sip:gateway@beronet.com>)
rpi_all (use Remote-Party-ID as dialplan source for calls to this 'Port-Group')
rpi_user (use the Remote-Party-ID user part: "berofix" <sip:gateway@beronet.com>)
rpi_display (use the Remote-Party-ID display part: "berofix" <sip:gateway@beronet.com>)
none (use nothing for the CLIP/CNIP)
manual (use a constant string for as CLIP/CNIP for calls to this 'Port-Group')
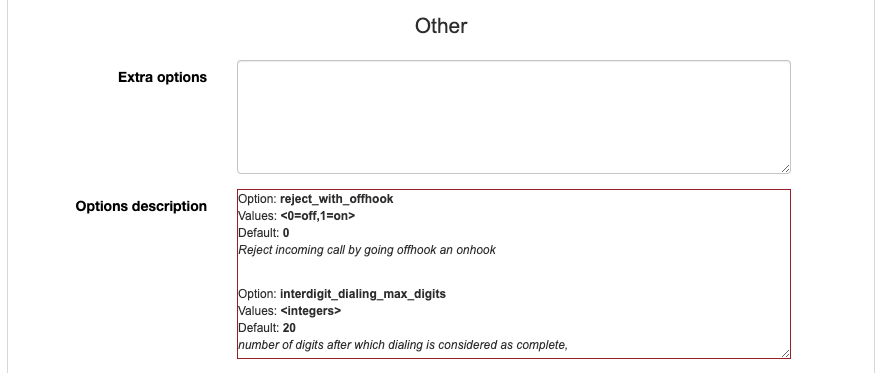
Additional configuration options
The mentioned below settings are mostly used and are directly outputted through the WebInterface.
But berofix has a lot of more settings, which are used in very special scenarios. These settings can be found at additional configuration options.
Analog FXS configuration
General FXS configurations
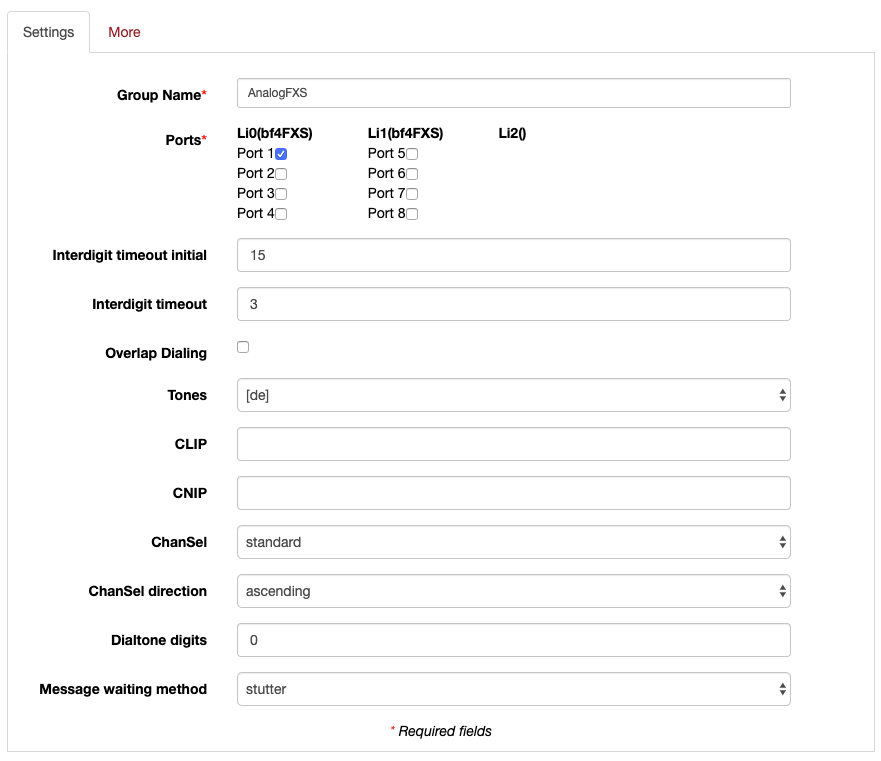
Group Name
Unique name of the 'Port-Group'
Ports
Ports which have been added to the 'Port-Group'
Interdigit timeout
For every incoming call a interdigit collect timer will be started. After this specified timeout, without getting a digit, the call will be processed to the Dialplan. Note this Timer is only started if 'Overlap Dialing' is deactivated. d default: 3 sec.
Interdigit timeout initial
This timer is the initial inter digit timer, that means before we got any digit. This Timer will be stopped after the first digit and the above mentioned interdigit timeout timer will apply. During this time a Dialtone will be generated. Note this Timer is only started if 'Overlap Dialing' is deactivated. (default: 15 sec.
Overlap Dialing
This option will activate real Overlap Dialing, for instance in analog environments. By activating this option the 'Interdigit' as well as the 'Interdigit timeout initial' timer will be deactivated.
Tones
Tone sets which are categorized by country
CLIP
To allocate a number for this 'Port Group' that you can use as destination in the Dialplan.
CNIP
To allocate an aphanumeric number for this 'Port Group' that you can use as destination in the Dialplan.
Chan Sel
Channel Selection schemes: (Standard / Random / Round Robin) default: Standard Standard - selects the next free channel in ascending order Random - selects the next free channel at random Round Robin - selects the next free channel base on the Round-Robin principle
ChanSel direction
Ascending or descending direction of the channel selection
Message waiting method
To define which message waiting indication method is used. Stutter Frequency-shift keying (FSK) off
Advanced FXS configurations
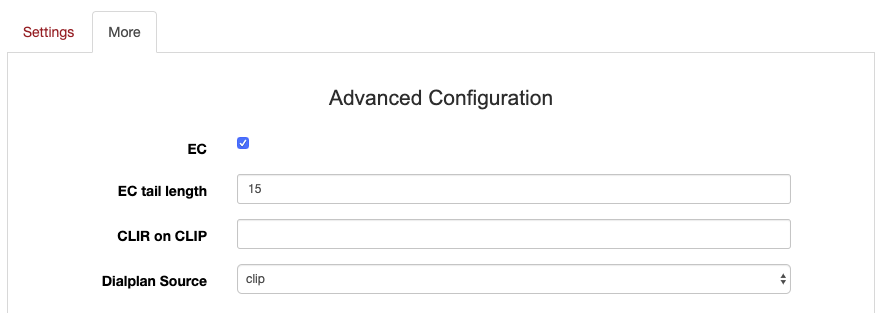
EC
This will activate or deactivate the onboard Hardware Echo canceler. Default: on
EC tail length
EC tail length [0=8ms,1=16ms,2=24...,15=128ms] (default value is 15=128ms) 16 tabs each 8ms.
CLIR on CLIP
To dynamically hide the CallerID in direction of this 'Port-Group' (FXS). For instance if the beroNet Gateway detects a call to this 'Port-Group' with a CLIP value correlates with a CLIR_on_CLIP value (after the dialplan), the CallerID will be hidden, that means the remote end doesn't see it.
Dialplan Source
The PSTN Caller-ID which is used as source for matching in the Dialplan. CLIP or CNIP
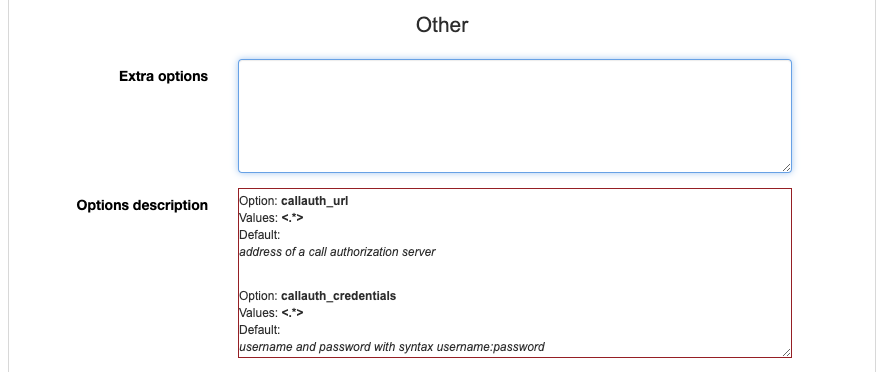
Additional configuration options
The below mentioned settings are mostly used and are directly outputted through the webinterface.
But the beroNet Gateway has a lot of more settings, which are used in very special scenarios. These settings can be found at additional configuration options.
LTE (and GSM)
LTE options
The LTE module behaves like all the other modules, which means its ports need to be grouped, so that they can be used in the Dialplan.
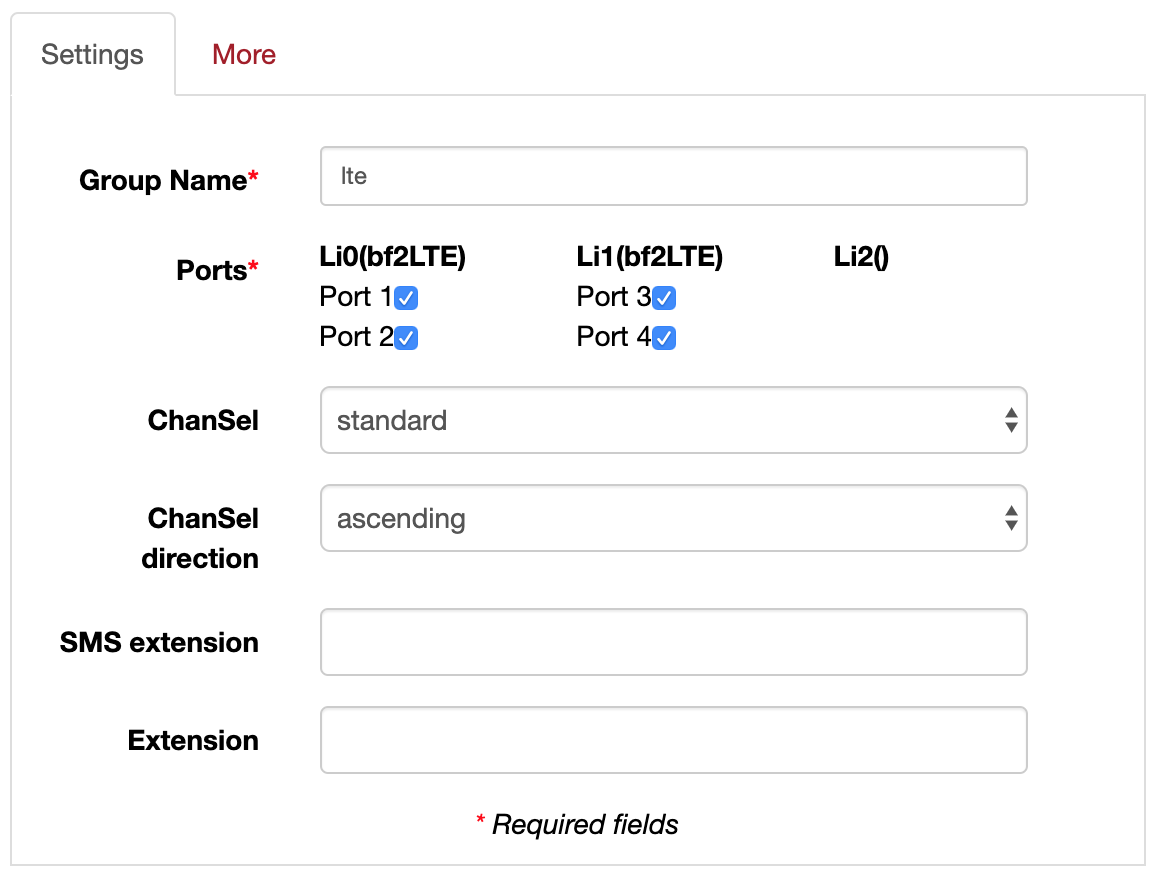
Group Name
Unique name of the 'Port-Group'
ChanSel
Channel Selection schemes: (Standard / Random / Round Robin) default: Standard Standard - selects the next free channel in ascending order Random - selects the next free channel at random Round Robin - selects the next free channel base on the Round-Robin principle
ChanSel direction
Ascending or descending direction of the channel selection
SMS Extension
The destination number for the SMS
Extension
The destination number
LTE general
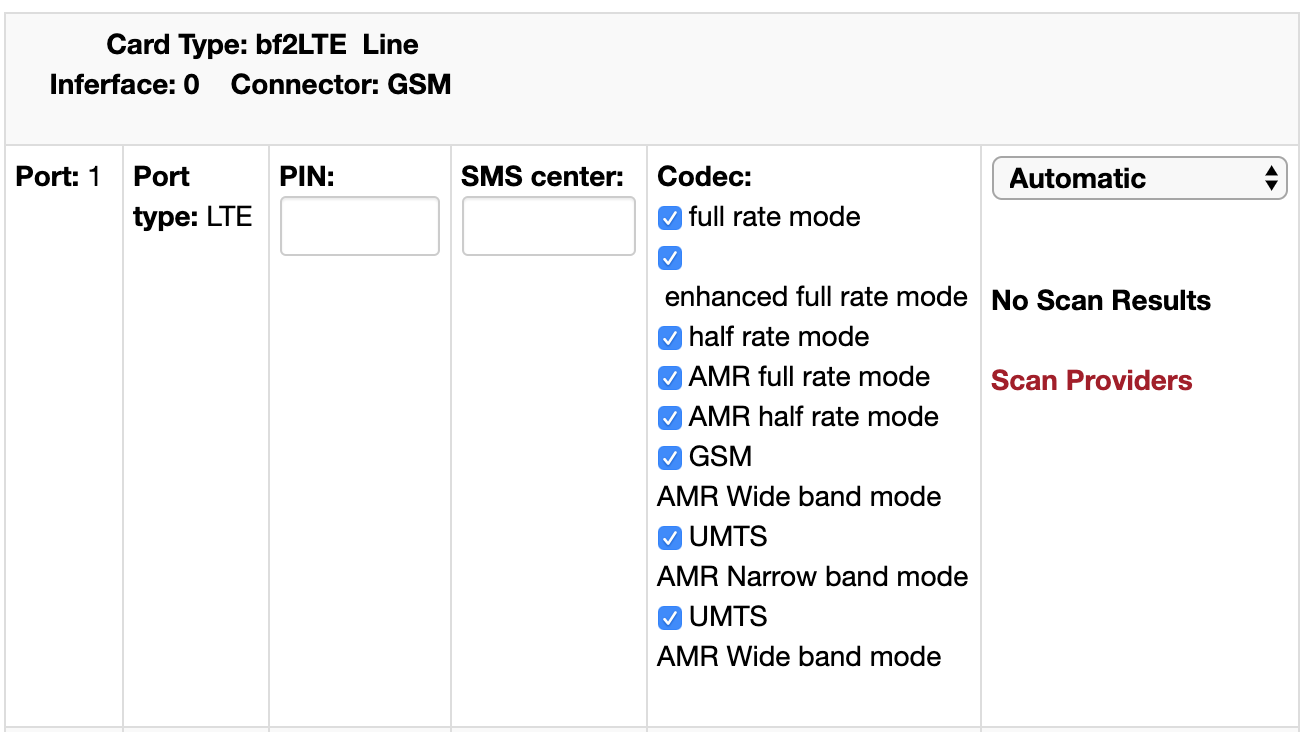
Every LTE Port has some unique configuration which is done in this settings page. These configurations are for example the PIN of the SIM card or the SMSC (SMS center) for the SIM card.
NOTE: The PIN can be left blank if no PIN is stored for the Sim Card.
The SMSC needs to be configured and is different for each provider. Lists can be downloaded on the internet, here are some germans providers SMSCs:
O2 +491760000443 D1 +491710760000 D2 +491722270000
This information is supplied without liability, you should contact your mobile provider.
SIP
By selecting the menu point SIP, you will be directed to the page containing all options regarding SIP. There are 2 menu-points, SIP and SIP Stacks which will be explained in detail in the next chapters.
SIP
In this chapter we will explain SIP specific configuration and settings. Under the menu point SIP you will get an overview about all SIP accounts.
As already mentioned in the chapter 'Port-Groups', you can add, modify and delete SIP accounts by clicking on the corresponding button.
.png?version=1&modificationDate=1698048481278&cacheVersion=1&api=v2)
SIP Configuration
A SIP account always consists of the following settings:
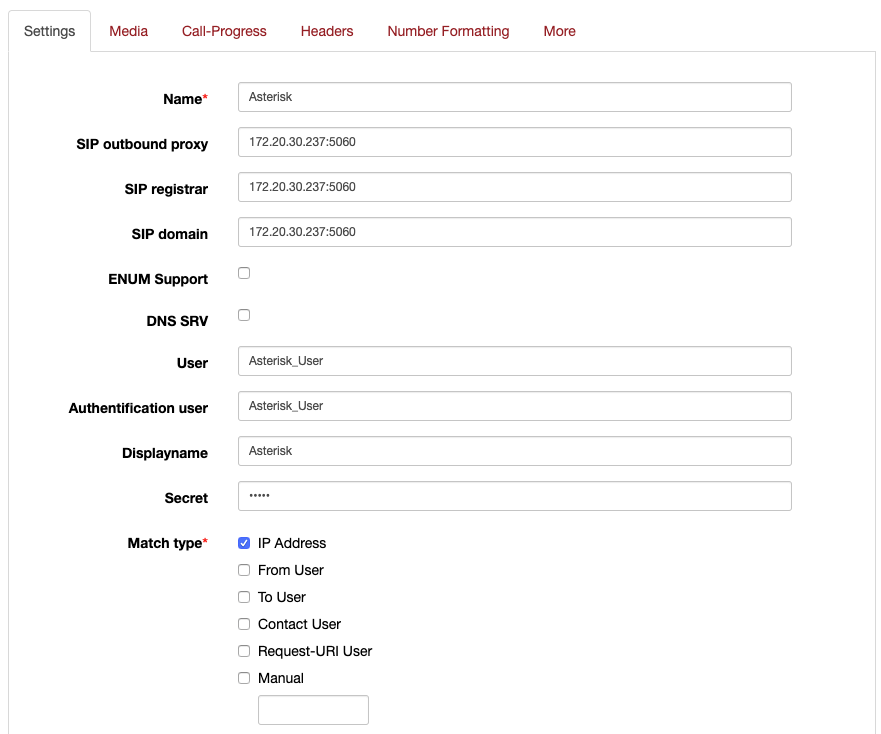
Name
Name you want to use for this SIP account. You can set it as you want, but it can help you with the assignment later.
SIP outbound proxy, SIP registrar and SIP domain
IP address of the SIP server (for instance your 3CX or Asterisk Server).
You can also set an alternative UDP port in the format sip.beronet.com:5061 if required (default is 5060)
If you want to connect this trunk to the SIP-Provider, you have to use the IP given by the Provider.
User
This username will be used as User Part in the SIP From Header. If you need to specify a different SIP From URL (sometimes called fromdomain) you can specify the SIP User in the form from_user@from_url by default the from_url is simply the server address.
If you're going to connect this trunk to the SIP-Provider, this is where the base-number should go.
Authentication user and secret
SIP Username and authentication password used for SIP authentication.
If you connect this trunk to the SIP-Provider, you have use the credentials given by the provider.
Match Type
The 'Match type' give you the possibility to choose which part of the from or To header the beroNet Gateway should use to match.
Note: The settings only match if you set the Match type in the relevant Dialplan to <Default SIP account>. It has the following options and meanings:
IP Address: By choosing this option, the IP-address from where the call is originated has to match to the 'Server address' of the SIP account, which has been chosen in the 'Server address' field.
From User: By choosing this option, additionaly to the IP-Adress, the SIP From_user part, of a call has to conform with the 'user' field of the SIP-account.
To User: Additionaly to the IP-address chosen in the server address field, the beroNet Gateway will match if the user part of the To Header conforms with the 'user' field of the SIP-account.
Contact User: Matches if the contact header conforms with the user field of the SIP-account.
Manual: with this option, you can set a manual address (IP-address) which should be used instead of an existing SIP-account. Matching is the same like described in 'IP Address' above. This field also could contain regular expressions. [192.168.2.15|192.2168.2.16]
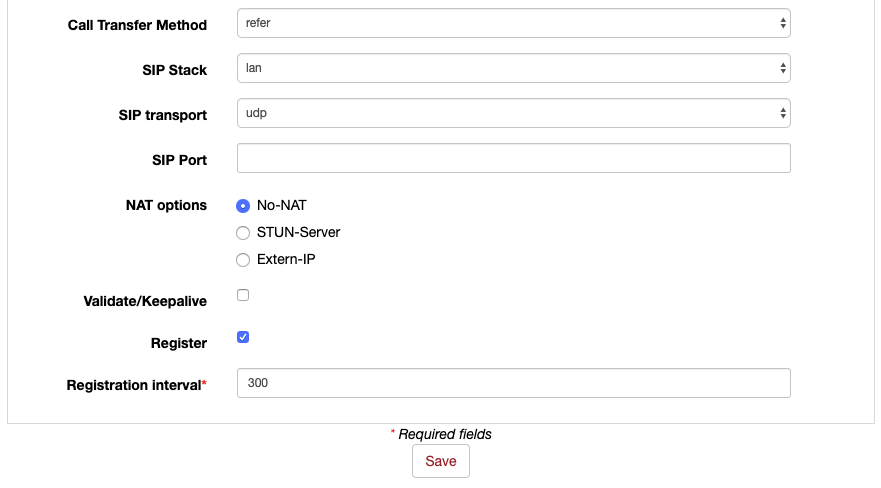
Call Transfer Method
SIP Stack
SIP transport
You can choose between the following supported SIP transport modes:
UDP (SIP Transport via UDP)
TCP (SIP Transport via TCP)
TLS (SIP Transport via TCP with TLS and Certificate)
SIP Port
Defines the local SIP Port for this account. The default is 5060 which is shared with all SIP Accounts.
The values can range from 1025 - 65535.
NAT options
Validate/Keepalive
When enabled, the gateway will regularly send OPTIONS packets for keepalive and monitoring of the remote peer.
It checks if the link between the two connections is operating, thus preventing the link from being broken.
The interval in which the messages are sent is given in seconds. (default is every 30s)
Register
When enabled, the gateway will send out SIP REGISTER messages to this SIP-accounts server address.
The gateway will automatically changes the following header settings depending on this option:
| Header | enabled | disabled |
|---|---|---|
| Dialplan Source | from_display (match for display_name at incoming invites) | from_user |
| From User Part | account_username (use account username as From_User for outgoing invites) | new_source (use NewSource as From_User for outgoing invites) |
| From Display Part | new_source | new_source (use NewSource from dialplan as From_Displayname for outgoing invites) |
The interval in which the registration attempts are sent is given in seconds. (default is every 300s)
Advanced SIP settings - Media
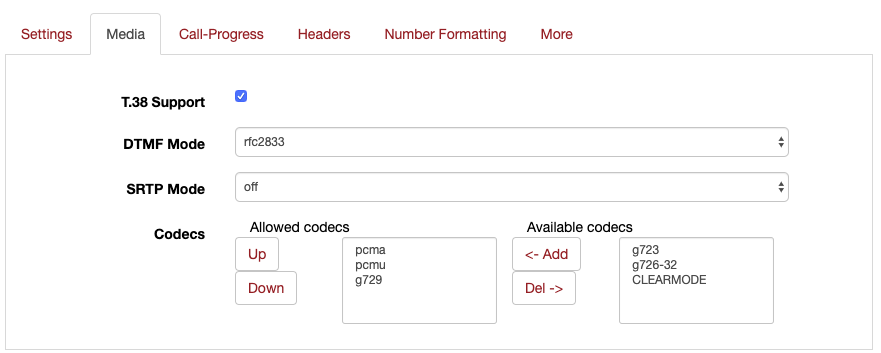
T.38 Support
Check for Fax Tones and tries a T.38 reinvite to make a reliable Fax-Over-IP Connection. The SIP device which is connected to the beroNet must support T.38. Most ATA's and some SIP SoftPBXs support T.38. Default is active.
DTMF Tones
DTMF mode over SIP
RFC 2833: tones transmitted via RTP packet inband: DTMF tones transmitted via inband info: DTMF via SIP-Info packets
SRTP
off: RTP/AVP session without crypto suites for SDP
optional: RTP/AVP session with crypto suites for SDP
mandatory: RTP/AVP session with crypto suites for SDP
Codecs
Defines which codecs are allowed and in which order they should be offered.
Advanced SIP settings - Call-Progress
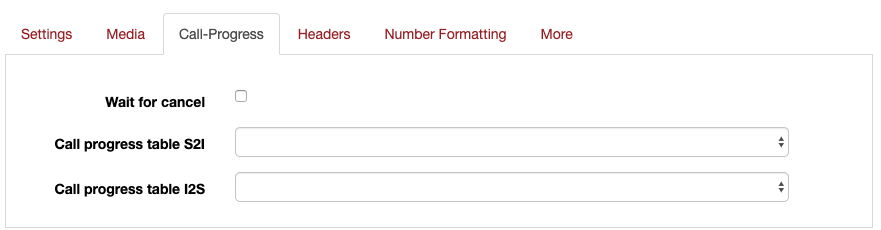
Wait for cancel
When the PSTN releases a call with a proper reason and with in-band information, this setting will be reviewed.
If enabled the beroNet Gateway will not immediately send the corresponding SIP response, instead it will make the in-band audio information available, so that the user can hear this message. The beroNet Gateway will wait until the user cancels this call while providing the in-band audio. If it is disabled the beroNet Gateway will immediately finish the call by sending the corresponding SIP response that is mapped for the PSTN Release reason. See also the beroNet Gateway ISDN Cause/SIP Response map for details of this mapping. Default: enable.
Call progress table S2I
Call progress table SIP to ISDN You can define which Call Progress Table should be used for this SIP account. By default (if left empty) the beroNet Gateway build-in Call-Progress Table would be used.
Call progress table I2S
Call progress table ISDN to SIP You can define which Call Progress Table should be used for this SIP account. By default (if left empty) the beroNet Gateway build-in Call-Progress Table would be used.
Advanced SIP settings - Headers
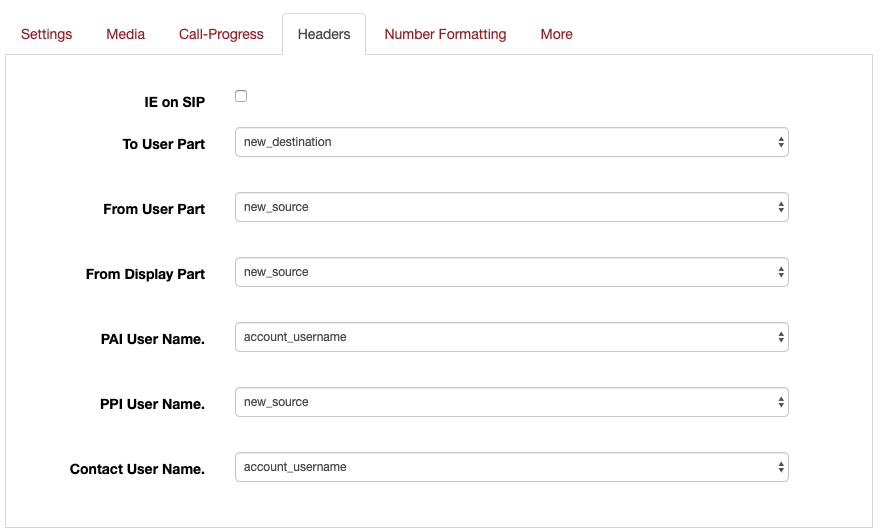
IE on SIP
Information elements on SIP activates the possibility to send additional ISDN Information elements over SIP-Headers.
If set to active, the beroNet Gateway will encode ISDN Information Elements like the 'Bearer Capability', 'Type of Number' or the 'Release Cause' etc. as X-BF SIP Headers. the beroNet Gateway will also look for X-BF Headers on incoming SIP Messages to decode them into ISDN Information Elements. See Howto to use X-BF Headers for more details. Default: off.
To user part
The value which will be used in the To user part in the SIP-Invite sending to the SIP-PBX.
new destination: use the value for the TO: user part which results in the New Destination part of the Dialplan.
dad: use the DAD which comes in
account_username: use user from this SIP-account as SIP
from_user manual: enter a manual value to be used as SIP from_user
From User Part
The value which will be used in the From user part in the SIP-Invite sending to the SIP-PBX.
new_source: use this value for the FROM: part which results in the new source part of the dial plan.
oad: use the orginated number
oad2: use the OAD2 if an OAD2 exists
qsigname: use the qsigname
account_username: use the user which is indicate in the SIP configuration
none: none
manual: enter a manual value to be used in the SIP From user part
From Display Part
The value which will be used in the From display part in the SIP-Invite sending to the SIP-PBX.
new_source: use this value for the FROM: part which results in the new source part of the dial plan.
oad: use the orginated number
oad2: use the OAD2 if an OAD2 exists
qsigname: use the qsigname
account_username: use the user which is indicate in the SIP configuration
none: none
manual: enter a manual value to be used in the SIP Display part
PAI User Name
The value will be used as the user name in the P-Asserted-Identity Header.
PPI User Name
The value will be used as the user name in the P-Preferred-Identity Header.
Contact User Name
The value will be used as the user name in the Contact Header.
Advanced SIP settings - Number Formatting
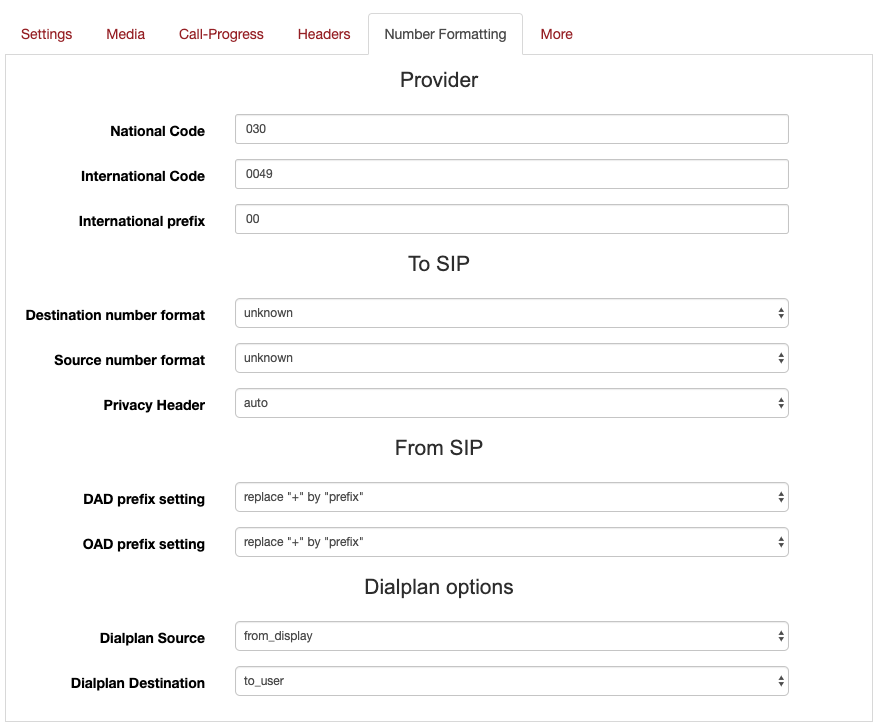
Provider National Code
City calling code with leading 0, e.g. 030 for calling Berlin.
This field is required if you set new_source_auto for oad (Caller ID).
International Code
Country calling code with leading 00 or +, e.g. 0049 or +49 for calling Germany.
This field is required if you set new_source_auto for oad (Caller ID).
International prefix
International prefix (Default:00)
'To SIP' Destination and Source number format
(00)(int)(nat)(num) e.g. 00 49 30 2593890
(+)(int)(nat)(num) e.g. + 49 30 2593890
(int)(nat)(num) e.g. 49 30 2593890
unknown (default - no ISDN to SIP formatting)
Privacy Header
auto: automatically set based on incoming PSTN call
off: header disabled
id: header is set to id
none: header is set to none
'From SIP' DAD and OAD prefix setting
none (default)
prepend prefix
replace: "+" by "prefix": "+" will replaced by value set in "International prefix"
Dialplan Source
Determines which part will be used for the Dialplan Source.
from_user (use SIP from_user as Dialplan Source for calls to this 'Port-Group')
from_display (use SIP from_display as Dialplan Source for calls to this 'Port-Group')
pai_all (use P-Asserted-Identity as Dialplan Source for calls to this 'Port-Group')
pai_user (use the P-Asserted-Identity user part: "berofix" <sip:gateway@beronet.com>)
pai_display (use the P-Asserted-Identity display part: "berofix" <sip:gateway@beronet.com>)
ppi_all (use P-Preferred-Identity as dialplan source for calls to this 'Port-Group')
ppi_user (use the P-Preferred-Identitiy user part: "berofix" <sip:gateway@beronet.com>)
ppi_display (use the P-Preferred-Identity display part: "berofix" <sip:gateway@beronet.com>)
rpi_all (use Remote-Party-ID as dialplan source for calls to this 'Port-Group')
rpi_user (use the Remote-Party-ID user part: "berofix" <sip:gateway@beronet.com>)
rpi_display (use the Remote-Party-ID display part: "berofix" <sip:gateway@beronet.com>)
Advanced SIP settings - More
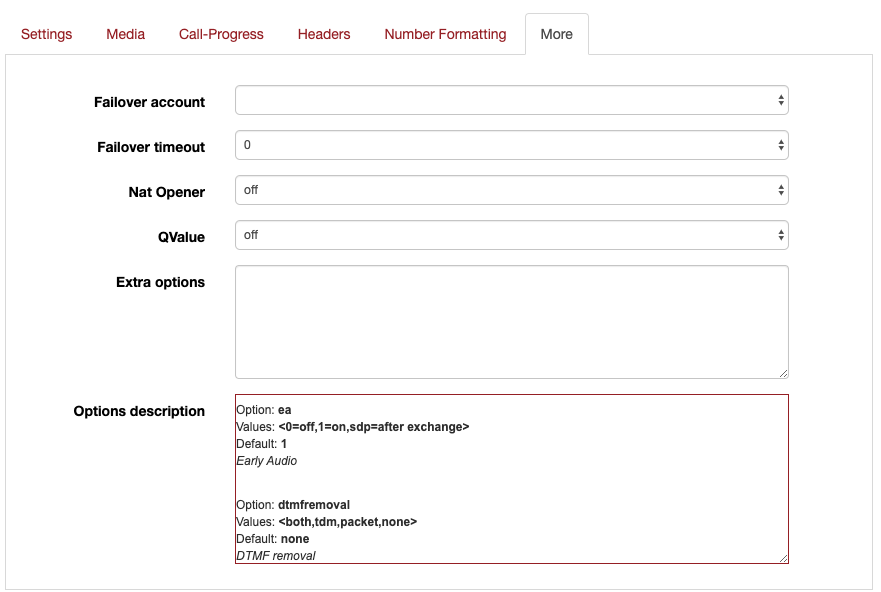
Failover account
This feature allows to provide a backup SIP Peer which is used in case the primary SIP Peer will not be reachable or will return a Server Error (503).
Failover timeout
The time without interruption of reconnection process. After this time the fail over account will be activated. 0 (off) - 60 seconds
Nat Opener
off: no action will be performed on voice start
silence: a few packets of silence are generated on voice start
dtmf: a DTMF packet will be sent on voice start
QValue
sets the QValue for outgoing registrations
Extra options
The below mentioned settings are mostly used and are directly outputted through the Webinterface. But the beroNet Gateway has a lot of more settings, which are used in very special scenarios. These settings can be found at additional configuration options.
SIP Stacks
Under SIP Stack you can set the following values:
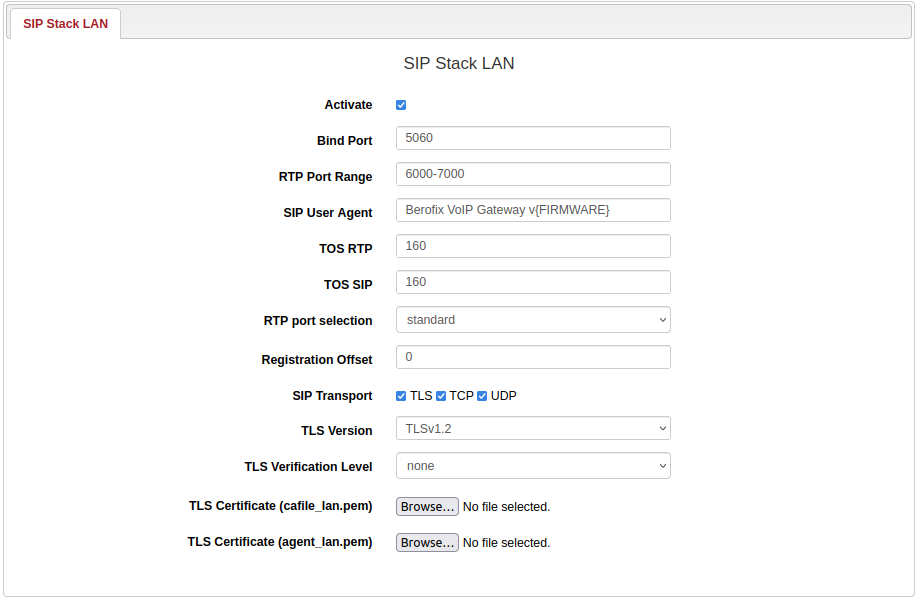
Bind port
The port on which the beroNet device should listen for SIP traffic. Default is 5060
RTP port range
RTP port range which should be used for RTP traffic. Default is (5000-5059,5062-6000,6000-7000)
TOS RTP
Type of service for RTP traffic. Useful for prioritization of the RTP traffic. Default: 160
TOS SIP
Type of service for SIP traffic. Useful for prioritization of the SIP traffic. Default: 160
RTP port selection
Standard and RoundRobin-Scheduling
SIP transport
The beroNet devices support the following SIP transport modes:
UDP (SIP Transport via UDP)
TCP (SIP Transport via TCP)
TLS (SIP Transport via TCP with TLS and Certificate)
TLS Version
set the version of TLS to use
TLS verification level
Set, when verification should be applied
TLS certificate (cafile)
TLS certificate (agent)
Dialplan
The Dialplan is one of the most important things to set up during the configuration of a beroNet device. The Dialplan defines rules concerning how calls should be routed under certain circumstances.
The beroNet Dialplan engine is based on regular expressions ('Howto RegEx') and reads the Dialplan entries from the top to the bottom. After the first match, the engine will leave the Dialplan and execute that rule. Therefore it is important to know that special dial plan rules should be placed on top while the general ones should be placed below them. This can be done by using the position arrows.
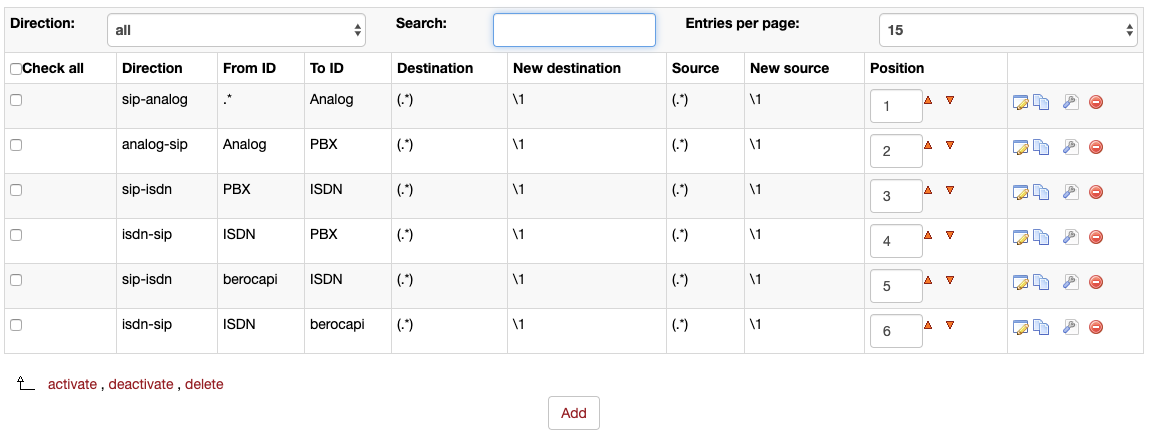
As you can see you can add, modify, copy and delete a dial plan rule by pressing on the corresponding button on the right of the table Furthermore you can access the advanced options for a particular dial plan rule by pressing the 'tool icon', which is also on the right-hand side of the table. Above the table you can set some filters for the Dialplan table like 'direction' or 'entries per page' or even search for a special character inside all fields of a Dialplan rule.
As you can see that there are several columns. Before explaining the meaning of each column, it is important to know that some of these columns are matching criteria and the others are executing ones. Matching columns are taken into account to decide if a particular Dialplan rule matches while the executing columns would be executed when a dial plan rule has matched. Only if all matching columns are true a particular Dialplan rule will it be executed.
Matching Columns:
Direction: The direction of the call. Here you can set the direction a call has to be from for this rule to qualify and to where the call is to be routed. For instance in the first row you see that the “call” has to originate from SIP and will then be routed to Analog. In the the second row it is vice versa.
FromID: The ID from where the call is originated. Depending on the direction that is chosen, the FromID could be the name of a 'SIP-account', a 'PSTN-port-group' or a manual value like an IP-address.
Destination: Also called "Called ID" or DAD. This is the number which the caller dialled.
Source: Also called "CallerID" or OAD. This is the number of the device of the caller.
Execution Columns:
To ID: The ID where the call should be routed to. Depending on the direction this could be a particular 'PSTN-port' a 'PSTN-port-group', the name of a SIP-account or an IP-address
New Destination: The New Destination after the Dialplan rule has been executed (see 'Destination' above).
New Source: The new source after the Dialplan rule has been executed (see 'Source' above).
New Dialplan rule
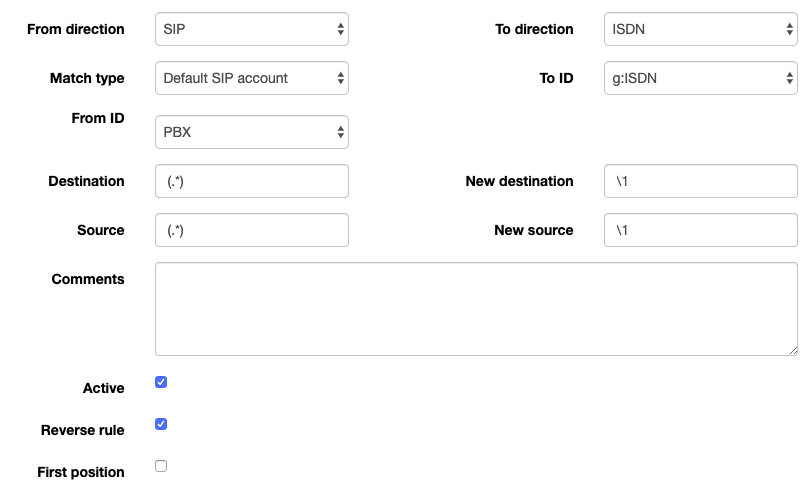
If you want to add a new rule, you simply click on 'Add'. Here you can see that on the left-hand side you have all of the matching fields and on the right all of the executing fields.
Each matching field corresponds to one executing field, that means there is always a pair of both.
From direction/To direction
The first pair is the direction pair, consisting of the fields 'From direction' and 'To direction'. 'From direction' is the matching field and it checks from where the call originated while the 'To direction' field (executing field) makes necessary changes so that the call can be routed to where you would like it to go. In the picture above we have chosen the direction SIP-to-ISDN. Depending on which modules are plugged in, the fields 'From direction' and 'To direction' could have the following values:
SIP, Analog (FXS/FXO), ISDN (PRI/BRI), LTE or GSM
In other words if haven't plugged in a LTE module, you will not see the LTE option in 'From direction' and 'To direction' pair.
Note: You can combine every technology direction with each other except the direction SIP-to-SIP.
From Direction is set to (ISDN / Analog / LTE):
In this case the 'From ID' is a list of all configured PSTN port-groups indicated by their names. For instance if you select ISDN you will only see the ISDN port-groups in the list. Alternatively to the port-group you could also select a single port, identifiable by it's port number. But this port has to be a member of a port-group anyway, otherwise you won't be able to select it. All calls which originated from this single port or the port-group would match the criteria 'From ID'.
From Direction is set to SIP:
If 'From Direction' is set to SIP, the 'From ID' is a list of all SIP-accounts, configured on the beroNet Gateway, indicated by their 'Name' field. In this case the a new field called 'Match type' would appear. The 'Match type' give you the possibility to choose how the dialplan should match for the From_ID. The match type has the following options and meanings:
Default SIP account: By choosing this option, the SIP account has to match to the SIP Account. This is the default option.
From IP: By choosing this option, the IP-address from where the call is originated has to match to the 'Server address' of the SIP account, which has been chosen in the 'From ID' field.
From User: By choosing this option, additionally to the IP-Address (see 'From IP'), the SIP 'From_user part' of the a call has to match to the 'user' field of the SIP-account, which has been chosen in the 'From ID' field.
To User: By choosing this option, additionally to the IP-Address (see 'From IP'), the SIP 'To_user part' of the a call has to match to the 'user' field of the SIP-account, which has been chosen in the 'From ID' field.
Manual Address: By choosing this option, you can set a manual address (IP-address) which can be used instead of an existing SIP-account. This field also could contain regular expressions e.g. [172.20.0.2|172.20.0.3]
To Direction is set to ISDN / Analog / LTE):
The To ID field is a bit easier, because it is the execution part. If 'To direction' set to PSTN (ISDN / Analog / LTE) a list of the corresponding configured PSTN ports groups or PSTN ports is shown and you can select the desired direction. If 'To direction' is set to SIP you can select one of the configured SIP accounts or enter a manual address as described above.
Destination / New Destination
This pair 'Destination / New Destination' is one of the most important matching criteria. The destination is the calledID (the number which was originally dialled) also named DAD, this means the number which enters the Dialplan. While the New Destination is the CallerID, when we leave the Dialplan. Both Destination and New Destination are based on regular expressions.
Source / New Source
This pair 'Source / New Source' very similar to the pair 'Destination / New Destination' but apply to the CallerID (OAD)
Comments
For each Dialplan rule you can leave a small comment. You can see the comment as a tooltip box in the 'Dialplan overview', when you hover over a Dialplan rule with the mouse.
Active
Each Dialplan rule can be active or inactive. You can see a deactivated rule in the Dialplan overview, it will be indicated as inactive by a grey background.
Advanced Dialplan options
When you have created a Dialplan rule you can customise it to be more advanced by clicking on the tool icon on the right-hand side of the dial plan overview page (the third icon on the right). Depending on what is set for 'From' and 'To Direction' you will have corresponding buttons to reach the more advanced options for ISDN / Analog / LTE / GSM and SIP.
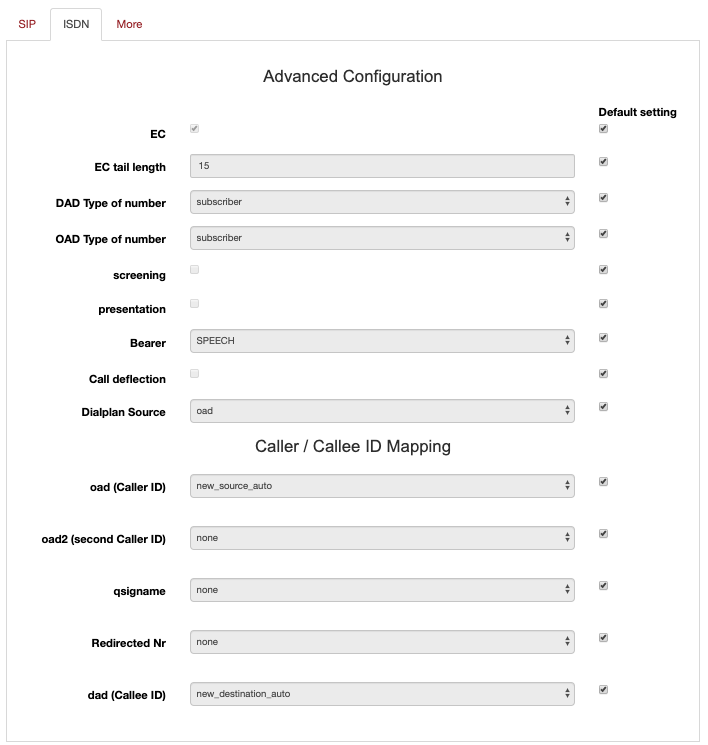
The picture above shows you the advanced options, in this case for ISDN. These settings are exact the same like described in the chapter 'Advanced ISDN PRI / BRI options' , which are attached to the 'ISDN Port Group'. In the Dialplan you have the possibility to make special settings for one particular rule. This means on the 'ISDN-Port-Group' you have the default settings while in the Dialplan we can overwrite one or more values for a specific Dialplan rule. In the right column of the above picture you can see the default button. By default this is activated.
For instance if we check the option EC (Echo canceling) you will see that the value EC itself and the default column are activated. This means that the default on the ISDN-port-group for the option EC is activated and the dial plan inherits this value. To change this particular value you have to deactivate the 'default' option and then deactivate the value EC, as you can see in the next picture.
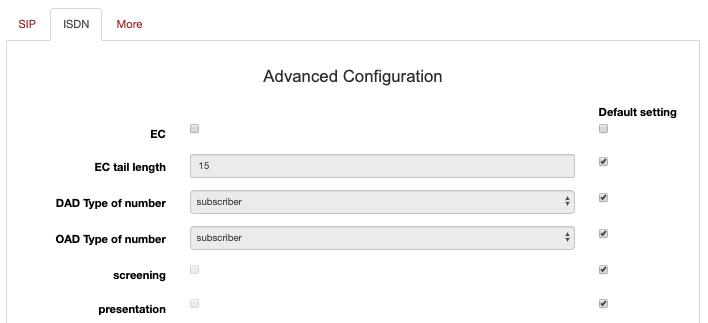
This should illustrate how you can make very specific Dialplan settings to particular rules.
Note: The dial plan always has the highest priority. For instance in the above mentioned example EC is deactivated in the dial plan but activated in the 'ISDN-port-group'. If the dial plan rule matches, the value EC would be 'off' although this value is set to be 'on' by the ISDN-port-group. All other options (Analog / GSM / LTE / SIP) follow the same mechanism as described here. For more information please read their respective Part.
Examples of Dialplan rules
The best way to explain the beroNet device handles Dialplan rules, is to show you some examples.
In Case you didn't read the 'HowTo RegEx', before we start showing you examples, this might help to understand them:
() will make everything contained by parentheses referable. You can refer to it by the use of the \<DIGIT> i.e. \1 for the first parentheses \2 for the next etc.
. is a special symbol that matches any single symbol
* is a multiplier that changes the statement after which it stands (i.e. .* would mean <any_symbol>AND<any_number_of> which would mean literally any string of any length)
(.*) therefore would cause anything to match and make it referable by its respective \<DIGIT>. This is also the default value.
Example 1: Incoming call from SIP with the following settings
SourceIP: 172.20.0.1 CallerID: 2593890 CalledID: 025938912
Dialplan entry values:
Direction: “SIP->ISDN” FromID: “.*” matches anything ToID: “(g:te)” routed to ISDN-port-group g:te Destination: “0(.*)” matches any calledID starting with '0' New Destination: “\1 “ \1 will reference to parameter 1 ( \1 the value in the first parenthesise of destination ) Source: “(.*)” matches any callerID New Source: “\1 “ \1 is the value in the first parenthesize of source
With these settings the the “Call” will be routed to ISDN-port-group “g:te”. The calledID will be changed to 25938912, that means the first '0' will be stripped while the callerID will routed transparent and still is 2593890.
Example 2: Incoming call from SIP with the following settings
SourceIP: 172.20.0.1 CallerID: 12 CalledID: 0176242XXXXX.
Dialplan entry values:
Direction: “SIP->ISDN” FromID: “172.20.0.1” matches if source IP-address is 172.20.0.1 ToID: “1” routed to ISDN-port 1 Destination: “0176(.*)” matches if calledID is starting with 0176 New Destination: “0049176\1” will cut 0176 from calledID and add 0049176 to the calledID, followed by reference to parameter 1 Source: “(..)” matches callerIDs with exact 2 digits. New Source: “25938912” CallerID will be overwritten by 25938912
With these settings the the “Call” would be routed to ISDN-port 1”. The CalledID will be modified to 0049176XXXXX. The CallerID will be changed to 25938912.
Example 3: Incoming call from ISDN with the following settings
ISDNPort: g:teports CallerID: 0176242XXXX CalledID: 25938912
Dialplan entry values:
Direction: “ISDN->SIP” FromID: ”g:teports” matches if the call is originated from the ISDN-port-group named 'teports' ToID: “p:mysipserver” routed to the SIP account named 'mysipserver' Destination: ”259389([0-8][0-9])” matches all numbers starting with 259389 followed by 2 digits in the range from [00-89] New Destination: “\1” will cut 259389 from calledID and add the 2 digits referenced by parameter 1 Source “(.*)” matches any callerID New Source: “\1 “ \1 is the value in the first parenthesise of 'Source'
With these settings the the “Call” would be routed to SIP account p:mysipserver. The CalledID will be changed to 12. The CallerID will routed transparent and still is 0176242XXXX.
Example 4: Incoming call from ISDN with the following settings
ISDNPort: 1 CallerID: 12 CalledID: 02593890
Dialplan entry values:
Direction: “ISDN->SIP” FromID: ”1” matches the call is originated from the ISDN-port 1 ToID: “p:mysipserver” routed to the SIP account named 'mysipserver' Destination: ”0([2-9])(.*))” matches all numbers starting with 0. The second digit has to be in range[2-9] followed by the any digits. New Destination: “\1\2” will cut 0 from calledID and add the parameter 1 followed by parameter 2 Source “(.*)” will match any callerID New Source: “\1 “ \1 is the value in the first parenthesise of 'Source' field
With these settings the the “Call” would be routed to SIP account p:mysipserver. The CalledID will be changed to 2593890. The CallerID is untouched.
With the above examples you should be able to handle almost every situation in the real world. If this is not enough and you need some special things, feel free to implement more complex regular expressions. More information about this can be found in the corresponding chapters.
Preferences
This chapter will explain the possible settings you can make in the preferences part of the webinterface.
Network settings
By selecting the menu point “Network” you can configure all network options like IP-address, netmask as well as the default gateway.
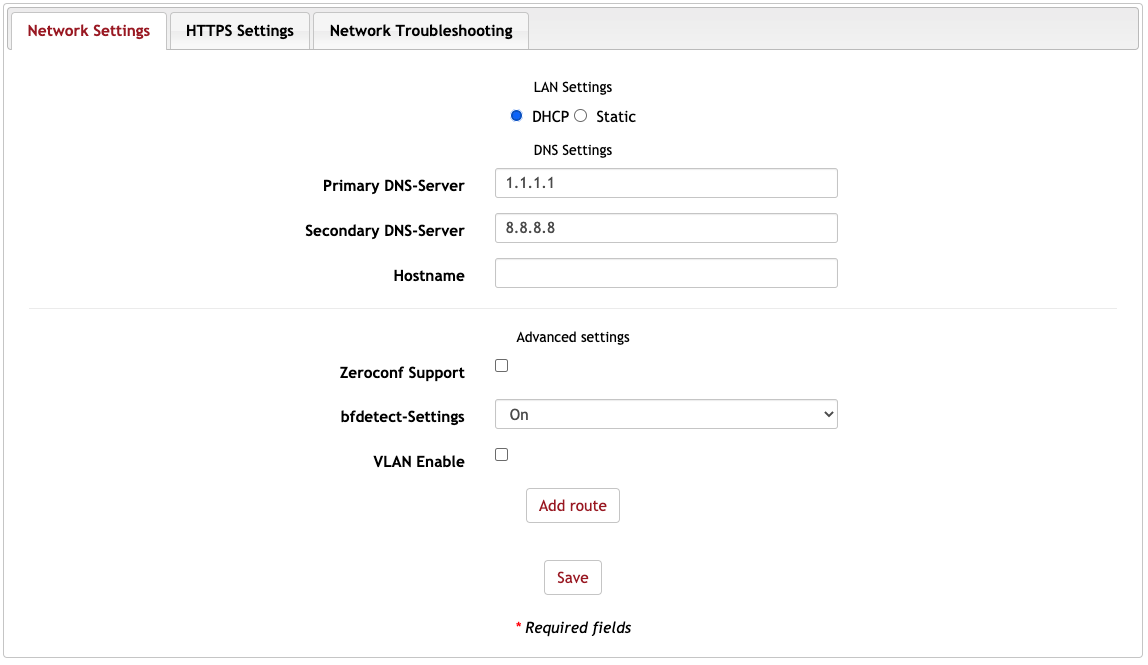
DHCP / Static IP
Choose to manually configure the beroNet network settings or use DHCP to get them from a DHCP server.
IP-Address
If you are using the static IP option you can enter the IP-address the berofix device should use in the network.
Netmask
If you using static IP you can enter the subnetmask the beroNet device should use.
Gateway
If you using static IP you can enter the default gateway the beroNet device should use.
Primary DNS-Server
IP-Address of the first DNS-server
Secondary DNS-Server
IP-Address of the second DNS-server
Hostname
Hostname of the beroNet Gateway
Advanced Settings
bfdetect Settings
Disable this option if you don't want your gateway to be detectable by the bfdetect tool.
VLAN Enable
If you want you add the beroNet device to a VLAN then enable this option.
Network Troubleshooting
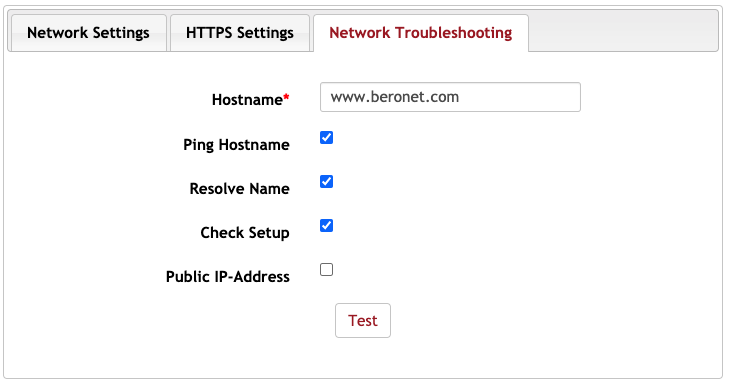
On the third tab you have several options regarding troubleshooting your network connectivity.
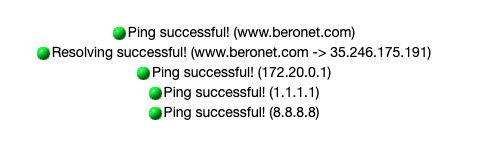
Here you can verify that your network setup works and the beroNet gateway is able to communicate to the internet.
You can also get your public IP-Address if you wish. Some provider need this for authentification!
Hostname
The given hostname is pinged or resolved to check if the default gateway and name server work correctly.
Ping Hostname
Ping the given hostname to check if the gateway has established an internet connection.
Resolve Name
Resolve the given hostname to check if the nameserver works correctly.
Check Setup
Ping the router and DNS to ensure that they are reachable at all.
Public IP-Address
Checks the public IP-Address of this device.
Time settings
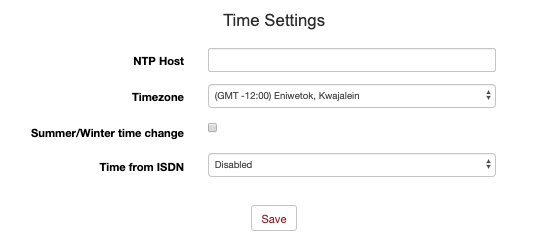
This is what the time settings look like:
NTP Host
If you want to get the time for your beroNet device from a server using hosting NTP, enter it's IP-address here.
Timezone
Please select the time zone you are using the beroNet device in.
Summer / Winter change
Enable this option if you want the beroNet device to automatically adjust the systemtime to summer / winter changes.
Time from ISDN
If you want the beroNet device to get its systemtime from ISDN, you can do so by enabling this option. You have to choose a specific port. All incoming ISDN calls are checked for the time and if it differs from the current system time, the system time is set to the new time.
Provisioning
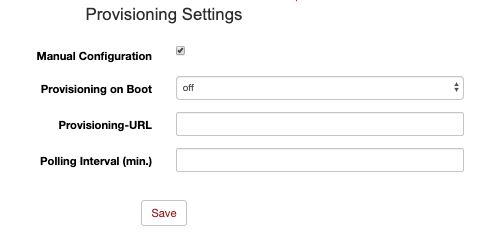
For using the provisioning feature, you can choose either TFTP or HTTP provisioning.
TFTP / HTTP Host
Enter the IP-address of the respective TFTP / HTTP host. (The host that provides the configuration. )
TFTP / HTTP URL
Enter the URL of the configuration file in question of the respective TFTP / HTTP server.
Use boot TFTP / HTTP
If this option is activated, beroNet Gateway will try to start provisioning process during the boot phase.
beroFos Heartbeat
Please read Failover Switchx manual for more information!
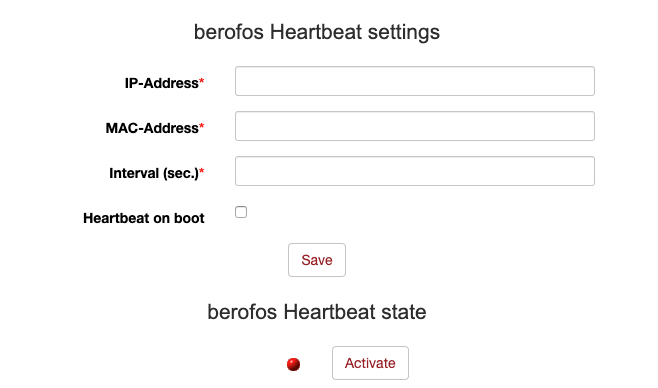
IP-Address
If you want to use the beroFos heartbeat feature, you need to enter the IP-address of the beroFos device here.
MAC address
If you want to use the beroFos heartbeat feature, you need to enter the MAC-address of the beroFos device here.
Interval (sec.)
Here you can set the interval in which the beroNet device sends a heartbeat signal to the beroFos device.
Heartbeat on boot
Enable this option if you want the beroNet device to send a heartbeat during and after booting automatically. (Alternatively you can also manually start the heartbeat)
beroFos heartbeat state
Activates / deactivates the heartbeat process
Logging
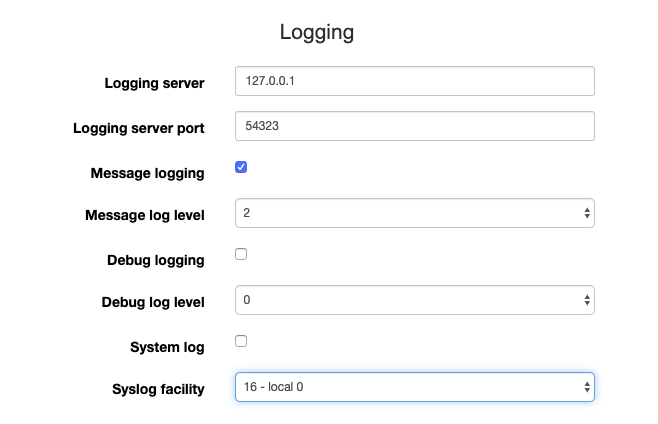
Logging server
The IP-address where the beroNet device should send it's logging information to.
Logging server port
The UDP port of the logging server
Logging Active
enable / disable the logging feature.
Log level
Here you can set the logging level. Log level 1 is very low while log level 9 is very high.
System log
Syslog facility
An information field associated with a syslog message. It is defined by the syslog protocol. It is meant to provide a very through clue from what part of a system the message originated from. LOCAL_0 to LOCAL_7 facilities are traditionally reserved for administrator and application use. The facility can be very helpful to define rules that split messages for example to different log files based on the facility level. Syslog_facility=[16-23] correlate to local0-local7.
Security
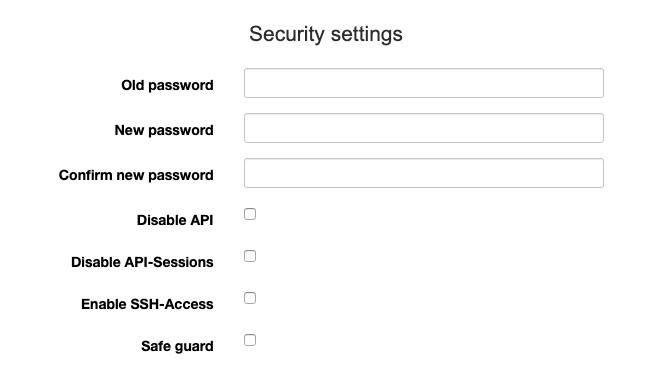
Old password
If you want to change your password, you must first enter the current one here as authentication.
New password
If you want to change your password, you can enter the new one here.
Confirm new password
If you want to change your password, you need to enter it again for verification.
Disable API
Disable API Sessions
Enable SSH-Access
Safe guard
ACL (Access Control List)
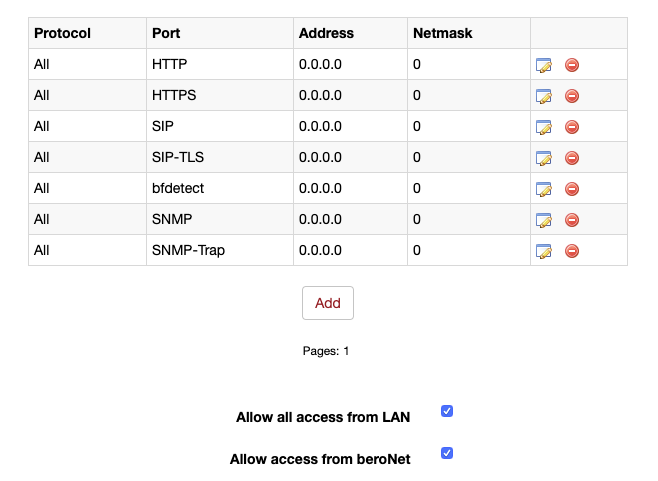
Access control list:
SIP Enter an IP-address or an IP-address range, to allow access to the beroNet Gateway SIP listening port.
SIP-TLS Enter an IP-address or an IP-address range, to allow access to the beroNet Gateway SIPS listening port.
HTTP Enter an IP-address or an IP-address range, to allow access to the HTTP interface.
HTTPS Enter an IP-address or an IP-address range, to allow access to the HTTPS interface.
Telnet Enter an IP-address or an IP-address range, to allow access to the telnet interface.
SSH Enter an IP-address or an IP-address range, to allow access via SSH.
SNMP Enter an IP-address or an IP-address range, to allow access via SNMP.
SNMP-Trap Enter an IP-address or an IP-address range, to allow access via SNMP-Trap.
bfdetect Enter an IP-address or an IP-address range, to allow responses to the bfdetect requests
All Manual
Note: By default the network connected to eth0 will be added as an allowed network i.e. all access via the LAN connected to eth0 will be allowed.
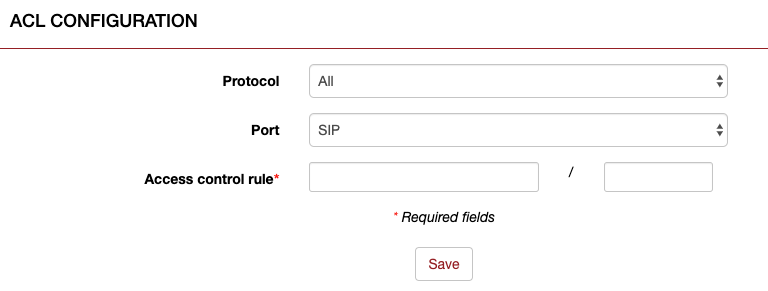
Example:
ACL 127.0.0.1 / 32 will limit the access to the IP-address 127.0.0.1 (localhost) ACL 192.168.1.0 / 24 will limit the access to the network 192.168.1.1-192.168.1.254 ACL 172.20.0.0 / 16 will limit the access to the network 172.20.0.1-172.20.254.254
Causes Map
With the causes map you can modify the sent causes.
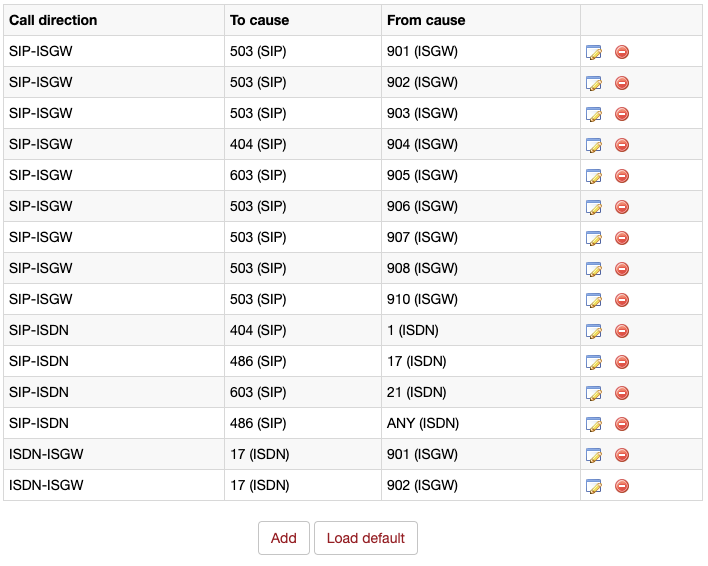
An example in the picture would be: SIP To cause converts the SIP status code [486 Busy Here] to the FROM ISDN causes code [17 User busy].
Call direction
To choose the direction of a call has to be from this cause to be relevant.
To cause (ISDN)
To choose a cause to which the original cause should be translated to.
From cause (SIP)
To choose which cause is to be converted to the different cause set above.
Please find more detailed info here: SIP response map.
Call Progress
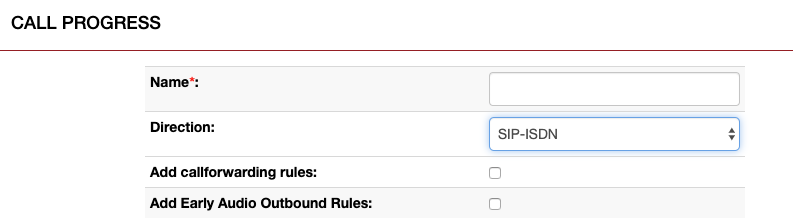
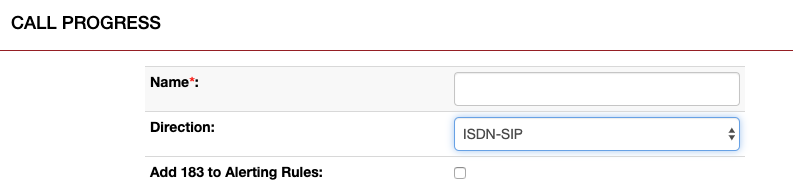
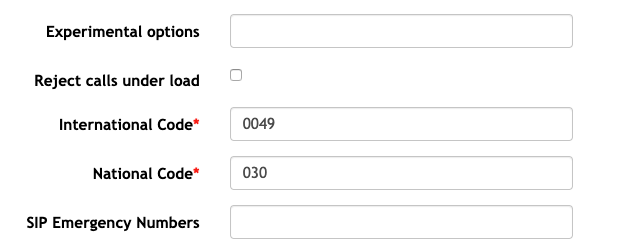
Miscellaneous
Management
In this menu point you can reach the settings, tools and information to manage the gateway.
State
This will give you an overview about the PSTN, SIP and PCM interconnection state. It shows the state of the PSTN-Ports.
ISDN status
All ISDN Ports , which are in a port group, with port number, the type of connection [PTP] or [PMP] and the state for layer 1 and layer 2. If the LED are green the port is up. You can get more information regarding the state of these ports by hovering over the L1 link and L2 link field.

Analog status
It shows a list of all analog ports which are in an analog-port-group. On FXO and FXS ports you can also see the line voltage by hovering over the Line voltage LED.

SIP Registration Status

Active Calls
This tab will give you an Overview of the currently active calls with the information seen in the picture below. This example is an incoming test call through the gateway from ISDN to SIP.

Ports Statistic
Here you can see statistics about the ports and dialplan directions that go through the gateway.

Backup and Restore
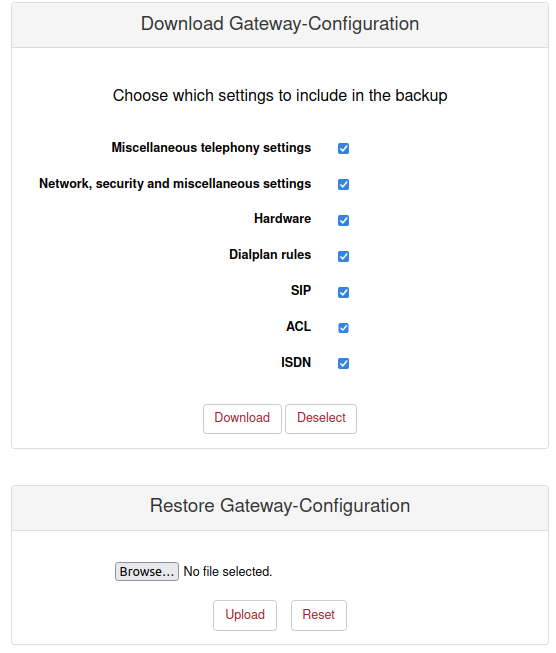
You can backup the configuration of berofix to an external file by just downloading it. These backup files could be used to restore the settings of berofix.
Be aware that this could be depending on the berofix firmware version. So if you try to restore a backup file from an older version of the firmware, the restore process could fail.
The backup is stored in a .config.xml file.
It is possible to select which parts of the config will be exported via the checkboxes, in case you want to import or export specific options only.
The selection for importing will be shown once the configuration file is uploaded
Firmware Update
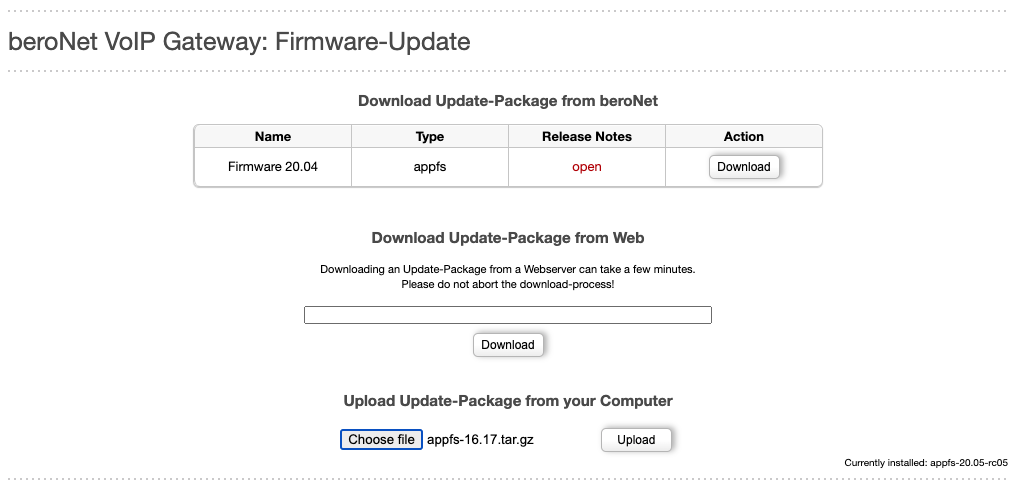
You have to reboot your device in Update-Mode in order to install a firmware image.
Once rebooted, you can always find the newest available firmware here.
Don't forget to backup your configuration before you install a new Firmware in case something doesn't work as intended.
Older firmware, in case you need to downgrade, can be installed here too, but must be downloaded first from the following link:
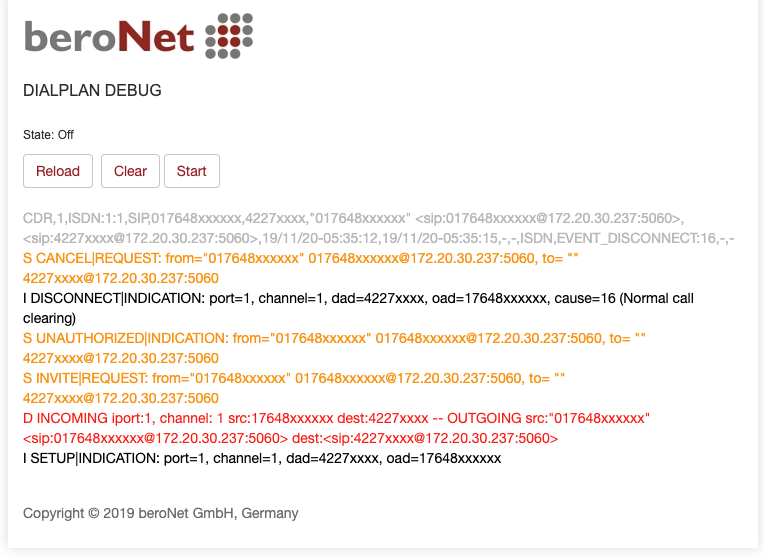
Dialplan Debug
This page is to give the user the opportunity to debug the dialplan if something is not working as expected.
Full Trace
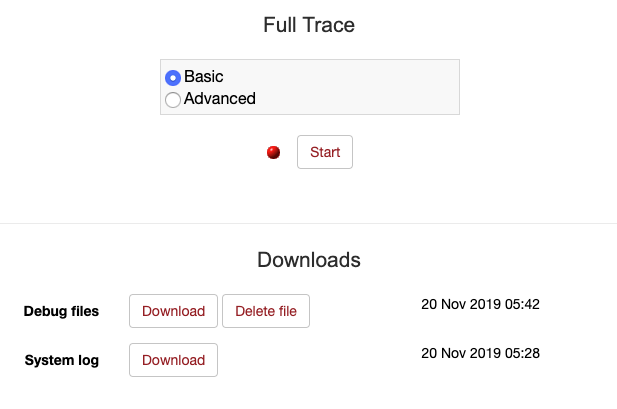
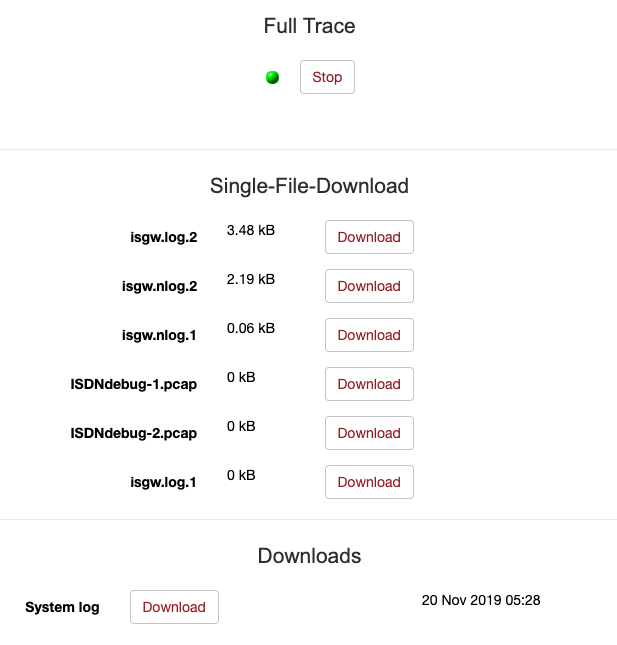
The menu point Full Trace will give you the opportunity to report us problems with the beroNet device on a defined way. This will help us to reproduce, analyse and fix your problem quite fast. On all ISDN Ports you can start a so called Full Trace by pressing the Button Start. By starting the debug process the system will start tracing all ISDN and SIP protocol elements. After you have finished your tests you can press stop and download the DebugFiles. All relevant information about the call-flow are stored in these files.
A small how-To can be found here:
Send this debug file in a ticket with a small description about your test and we will be able to reproduce and hopefully solve your problem.
→ beroNet Supportdesk
Info
This Info page give you some general Informations about the System like the hardware and the software.
Reboot/Reset
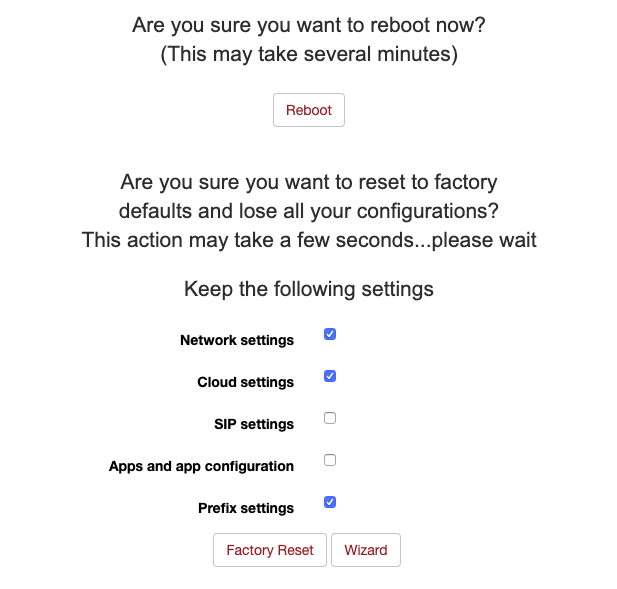
By select the menu point Reboot / Reset, you can reboot or reset the device to factory default.
If you want, you can keep certain parts of your configuration when doing a factory reset by checking the appropriate box. Hardware/Module specific settings like ISDN and ANALOG settings cannot be kept during the factory reset.
When changing the modules or hardware in the gateway, you are prompted to do a factory reset to enable the new/changed modules.
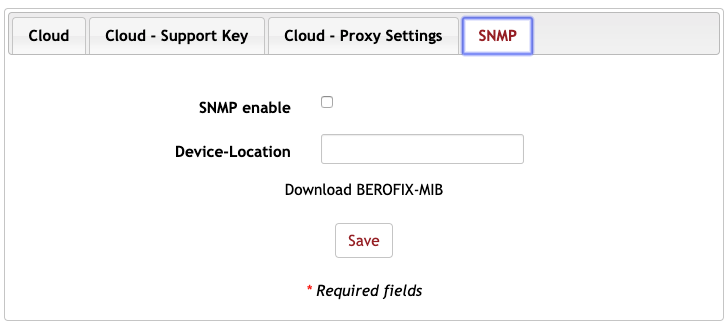
Remote Management
Apps
Developing Apps
The beroNet Gateway is able to provide additional services beside its gateway functionality. This is made possible through the berofix application framework,
an easy to use solution that lets developers create applications to be run on the embedded berofix plattform. Sample applications like the asterisk telephony framework are provided by beroNet to show how powerful such apps can be.
If you want to learn more about developing apps for beroNet devices visit: → http://developer.beronet.com/index.php/Developer
Market
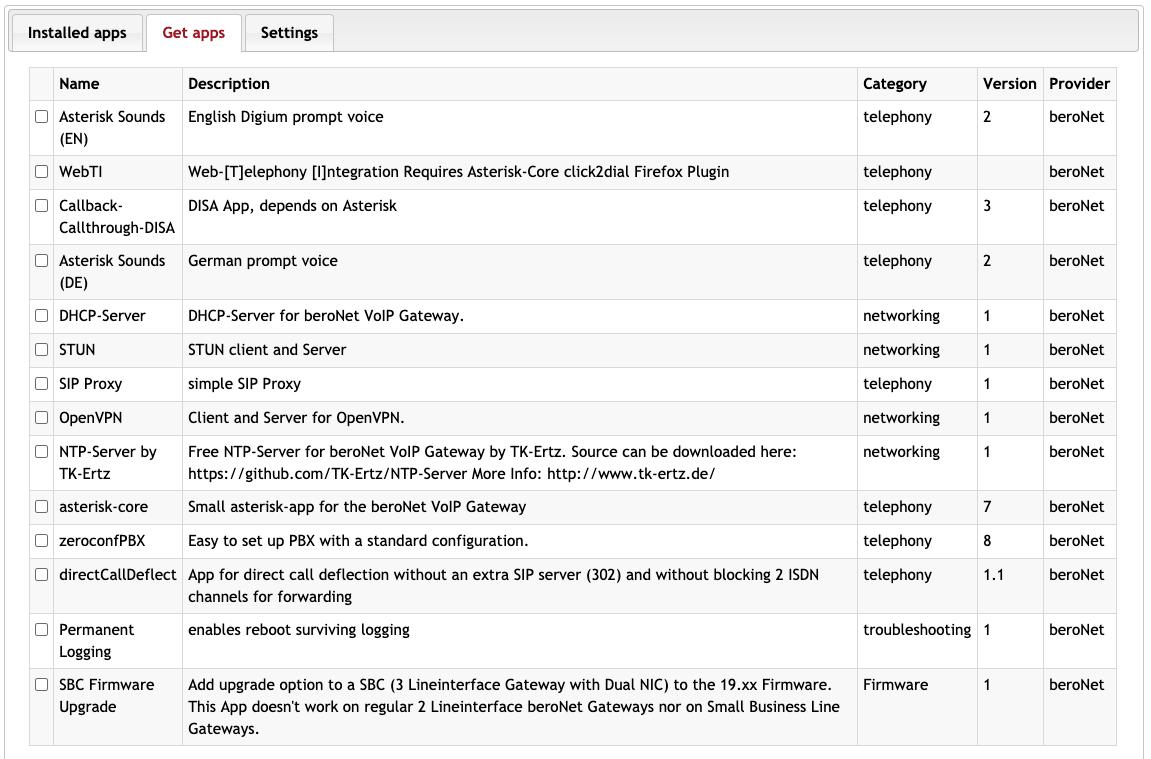
Several Apps can be found and installed under Market. If you click on Get App List you get a list of apps that can be downloaded and reached over the Apps tab in the navigation bar.
beroCloud
Under the beroCloud settings, you can configure and register your gateway to the beroCloud. Click on the Logo to get to the Website of the beroCloud.
Click here for a small guide on how to register and use the beroCloud:
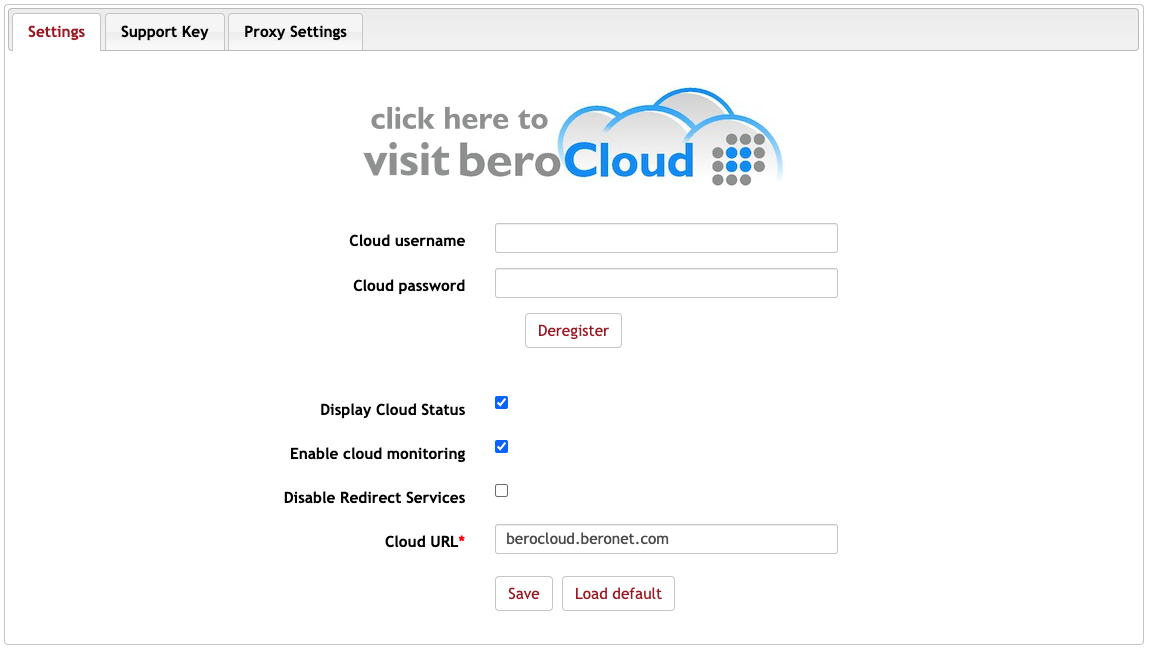
If you already have an Account you can register the gateway to your beroCloud Account by entering your credentials and pressing Register
If you want to deregister, just click on deregister, or deregister it directly from the cloud.
Display Cloud Status
Shows the current beroCloud status in the header everywhere in the GUI
Enable cloud monitoring
When enabled, the gateway sends current status informations such as network information, SIP-Registration, ISDN Port status and statistics like CPU/Memory
Disable Redirect Services
The redirect services can be used to gather tasks during every startup, such as registering to cloud or set provisioning.
This service can be disabled for security reasons.
You can find more information about it here: → Device Redirect Service and Provisioning
Using SIP-to-SIP and SBC Functionality
You can have up to 2 simultaneous SIP-to-SIP calls, but you can increase that number by adding a SIP-to-SIP license on the gateway to connect more SIP peers.
How to order and install a SIP-to-SIP licence on the gateway
Each SIP-to-SIP licence is linked to a single gateway. We therefore need the serial number of the gateway in order to create a licence for it.
To find out the serial number of your gateway, go to Management → Info.
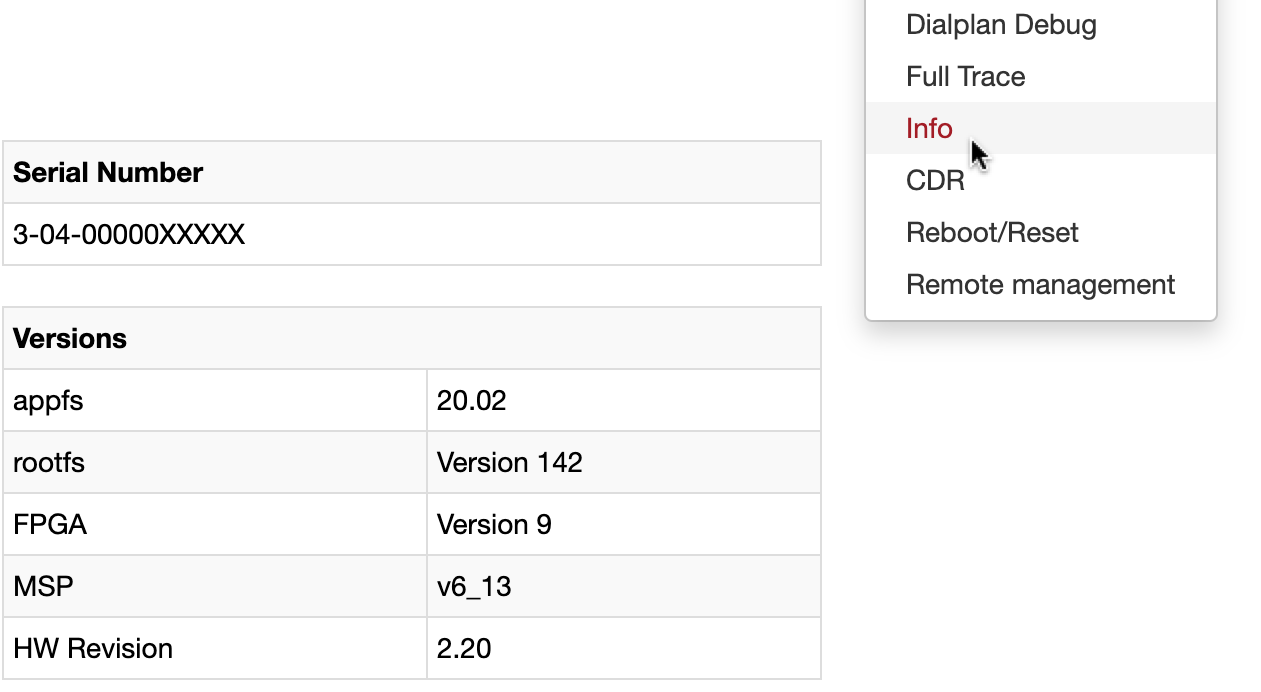
You have to Include the serial number of your gateway in the license order you place at your local distributor.
You will then receive a file with the name "isgw_SerialNumberOfTheGateway.licence".
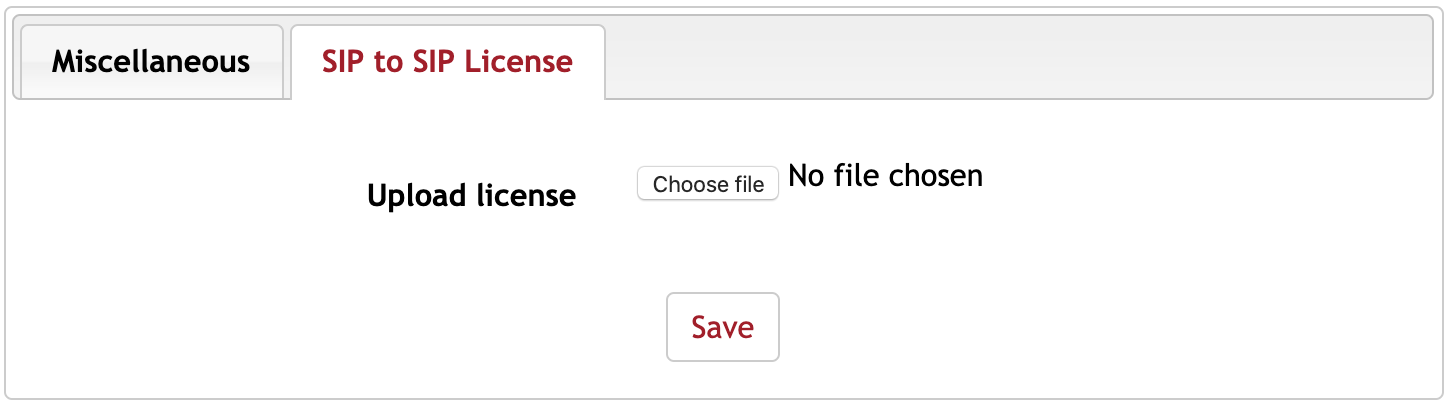
To install the license in your gateway, go to Preferences → Miscellaneous → SIP to SIP License and upload the licence.
How to use your SIP-to-SIP licence
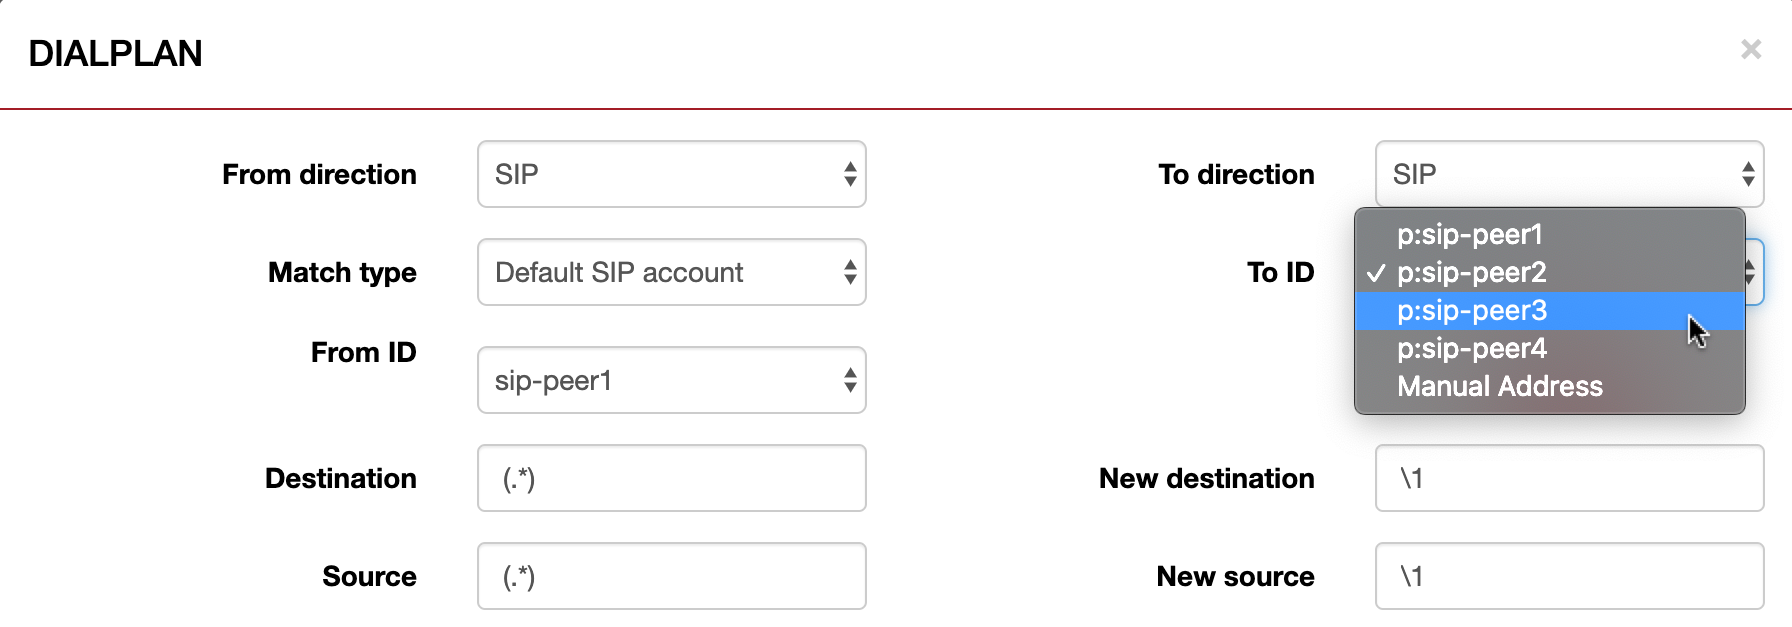
Once your license has been uploaded on the gateway, you can connect the SIP peers in the Dialplan.
- Create two SIP peers or accounts under SIP → SIP
- Create dialplan rules to link both SIP peers under Dialplan
Available licences and upgrades
Different SBC Software licenses are available:
| Article name | Description | Gateway needed |
|---|---|---|
| BNSBC-SESSION-4 | beroNet SBC Software License for 4 sessions or simultaneous calls without transcoding | at least BNSBC-M or higher |
| BNSBC-SESSION-8 | beroNet SBC Software License for 8 sessions or simultaneous calls without transcoding | at least BNSBC-M or higher |
| BNSBC-SESSION-16 | beroNet SBC Software License for 16 sessions or simultaneous calls without transcoding | at least BNSBC-L or higher |
| BNSBC-SESSION-32 | beroNet SBC Software License for 32 sessions or simultaneous calls without transcoding | at least BNSBC-L or higher |
| BNSBC-SESSION-64 | beroNet SBC Software License for 64 sessions or simultaneous calls without transcoding | BNSBC-XL |
Upgrades are available from license 4 → 8, 8 → 16, 16 → 32 and 32 → 64.
If you need scheduled remote assistance, you can request our on-demand support services: https://www.beronet.com/support